
Langchain Open Deep Research Internals: A Step-by-Step Architecture Guide
A detailed walkthrough of Langchain Open Deep Research's architecture, showing how state evolves, agents coordinate, and design patterns combine at each execution step.
This blog post is a different kind. It’s a deep dive explanation of how Open Deep Research works under the hood and which design patterns are applied to make it one of the best open source deep research agents.
How is this post different from other resources?
The LangChain GitHub repo and blog posts provide only high-level explanations of how things work.
LangSmith and LangGraph Studio don’t expose all the details—it’s difficult to capture the state at each step and the dynamic invocation of the graph. Therefore, it’s hard to understand the full picture at each step of execution.
A solid grasp of reflection agents, tool-use design patterns, and basic recursion is required to fully understand the process.
This is a long post by design, so brace yourself. We’ll start by aligning on the high-level design of Open Deep Research. We’ll then cover several design patterns used in the implementation that are crucial for understanding. Finally, we’ll take a step-by-step deep dive through an example to see how the Open Deep Research graph and state evolve at each step.
How It’s Designed
I assume you’ve read the official LangChain blog post that explains how Open Deep Research is built. However, to ensure we’re all on the same page, let’s have a quick look at the architecture.

The agent conceptually consists of three main parts: scoping, research, and final report. Any design variation you might want to build will likely contain these three components.
The goal of the scoping part is to build the input for the research phase. In Open Deep Research, this consists of a user clarification loop—the LLM determines whether it requires any clarification from the user or not—and then brief generation.
If you design your own agent, this is where you can perform user prompt optimizations or apply other techniques to improve the quality of user input.
When the brief is generated, it proceeds to the research phase. This is where the heavy work happens. We’ll go into much more detail later, but in a nutshell, it consists of two stages: supervisor and research sub-agents. The supervisor, given the brief and using reflection, spawns multiple research sub-agents on demand, each with a dedicated sub-task. Each sub-agent (sub-graph) receives a dedicated topic, performs research on it, and returns a summary to the supervisor. When the supervisor reflects on the results and decides that it has gathered enough data, everything moves to the Reporter part.
The Reporter takes all the collected information and generates the final result. If your result is too large, this is where you can generate an artifact (like in Claude) instead of text results.
Prior Knowledge
To understand how Open Deep Research really works, we need to discuss several patterns in isolation that are used throughout. It’s not the classic ReACT pattern that’s now standard.
Reflection Pattern

The reflection pattern enables agents to evaluate their own output and use that feedback to refine their responses iteratively. In this pattern, an LLM generates an initial response, then acts as its own critic to assess the quality of that output. Based on this self-critique, the agent produces an improved version, repeating this cycle until it meets quality standards or reaches a stopping condition. This self-correction loop allows agents to avoid getting stuck in purely reactive thinking patterns and move toward more deliberate, methodical problem-solving.
Tool Use Pattern

The Tool Use pattern is fundamental to understanding Open Deep Research’s architecture. While it might seem similar to standard tool calling, there are crucial differences that enable more sophisticated agent behaviors.
Standard Tool Calling (ReACT)
In classical ReACT architecture, tool calling is straightforward:
@tool
def search_web(query: str) -> str:
    “”“Search the web for information.”“”
    return tavily_search(query)

# LangGraph automatically:
# 1. Detects the tool call in LLM response
# 2. Executes the function
# 3. Adds result to message history
# 4. Continues to next LLM call
This works great for simple tools, but has limitations when dealing with complex operations.
The Manual Tool Use Pattern
Open Deep Research uses a different approach—manual tool orchestration. Here’s why and how:
Why is this needed?
Complex operations: When a “tool” is actually spawning an entire subgraph (like a research sub-agent), you need more control
Memory management: Tool results can be massive (e.g., full research reports). Adding everything to message history bloats the context window
Custom routing logic: You might need to handle tool execution differently based on business logic
Parallel execution: Spawning multiple sub-agents simultaneously requires manual coordination
How it works:
Define tool schemas without implementations:
class ConductResearch(BaseModel):
    “”“Tool definition for spawning a research sub-agent.”“”
    topic: str = Field(description=”The research topic to investigate”)

# Note: This is just a schema - no actual function implementation
Bind schemas to the LLM:
llm_with_tools = llm.bind_tools([ConductResearch, ThinkTool, ResearchComplete])
LLM returns structured tool calls: When the LLM decides to “use” a tool, it returns:
AIMessage(
    content=”I’ll research this topic now”,
    tool_calls=[
        {
            “name”: “ConductResearch”,
            “args”: {”topic”: “machine learning frameworks”},
            “id”: “call_abc123”
        }
    ]
)
You manually handle the tool execution:
# Check if LLM wants to call a tool
if message.tool_calls:
    for tool_call in message.tool_calls:
        if tool_call[”name”] == “ConductResearch”:
            # Spawn a research sub-agent (a whole subgraph!)
            result = await research_subgraph.ainvoke({
                “research_topic”: tool_call[”args”][”topic”]
            })

            # Return a compact confirmation, not the full result
            return ToolMessage(
                content=f”Research completed on {tool_call[’args’][’topic’]}”,
                tool_call_id=tool_call[”id”]
            )
Key Benefits in Open Deep Research:
Subgraph invocation: The supervisor can spawn entire research sub-agents as “tools”
Context efficiency: Instead of adding a 10,000-token research report to the message history, you return a simple “Research completed” message
Flexible routing: You can route different tool calls to different subgraphs or handlers
Parallel coordination: Spawn multiple research sub-agents simultaneously, each with isolated context
The Trade-off: You lose automatic tool execution but gain fine-grained control over when, how, and what gets executed. This control is essential for sophisticated multi-agent architectures like Open Deep Research, where “tools” are actually entire reasoning subgraphs with their own state management.
Deep Step-by-Step Guide
Now that we have all the necessary knowledge and a high-level understanding of how Open Deep Research is designed, it’s time for a deep dive.
The best way to describe it is to walk through an example step-by-step and see how the overall graph and state of the deep research agent change at each step.
Each step contains a corresponding image showing how the graph looks and the LangGraph state object (in green) at that step.
Step 1: User Question
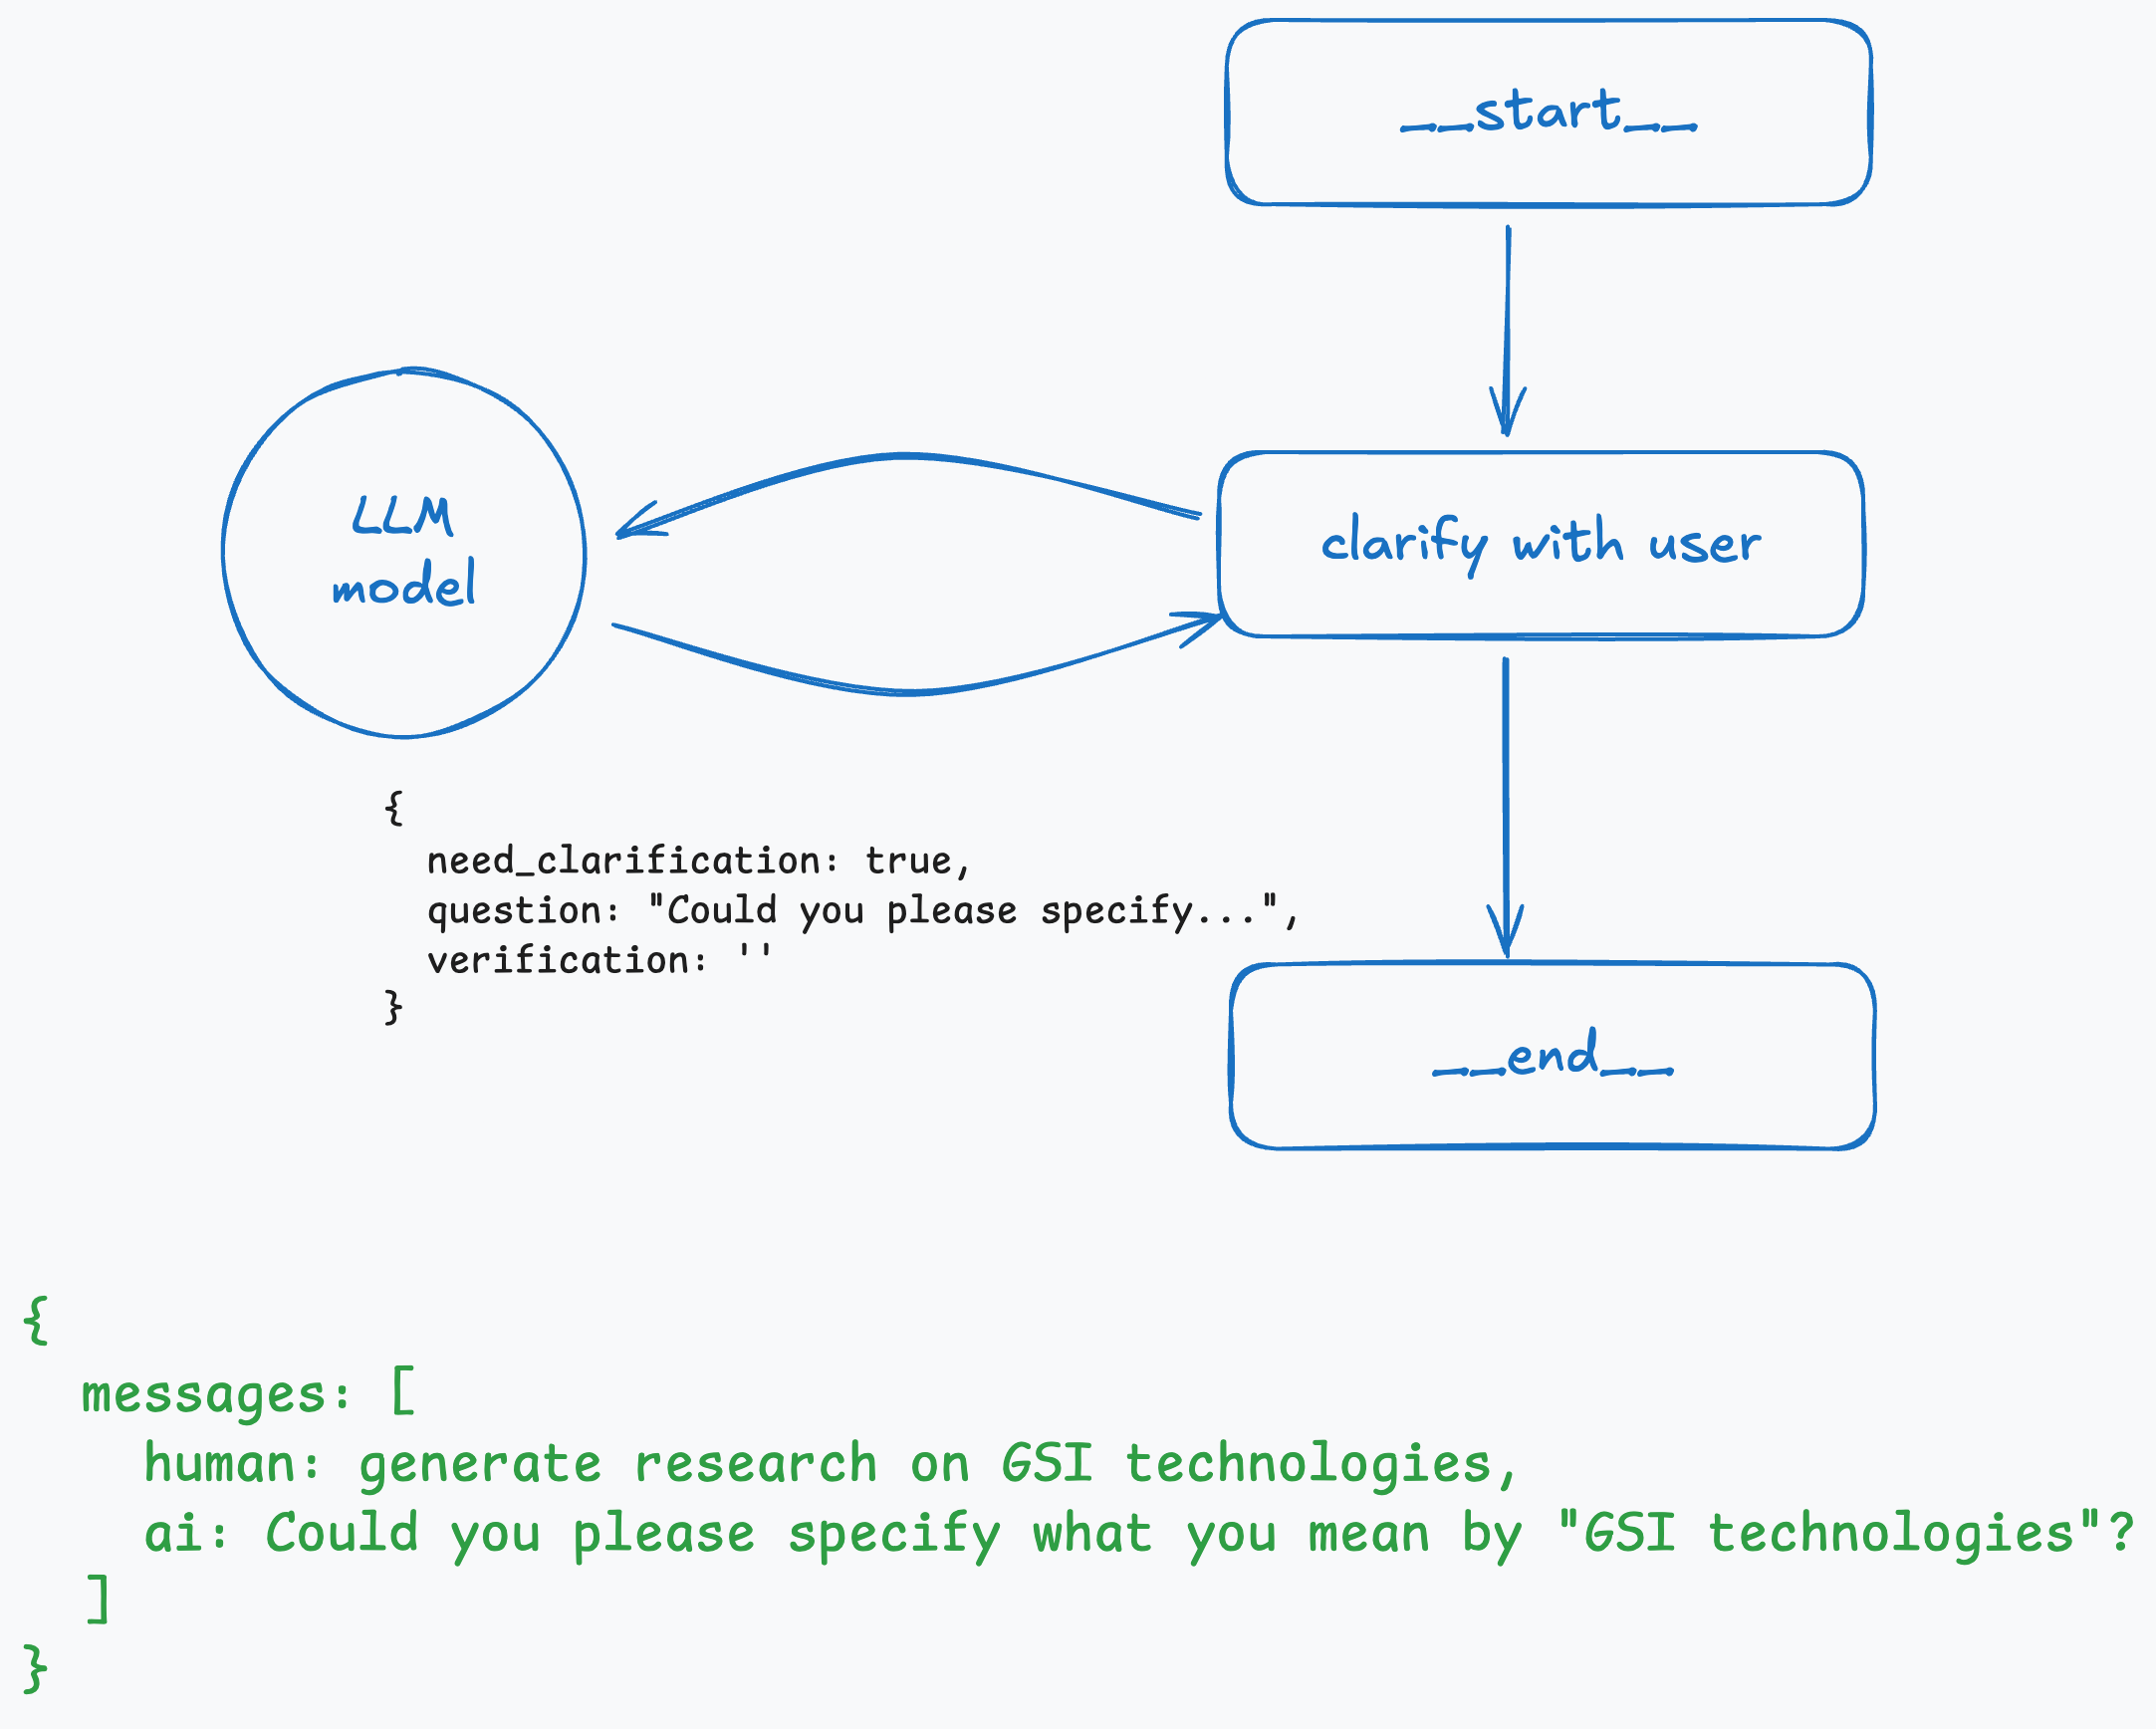
It all starts with the user question. The LLM decides, using structured output, whether it requires any clarification from the user. If so, it returns the corresponding boolean value and a follow-up question that is sent to the user. The state at this stage is simple: an array of messages.
Step 2: User Responds to a Clarifying Question
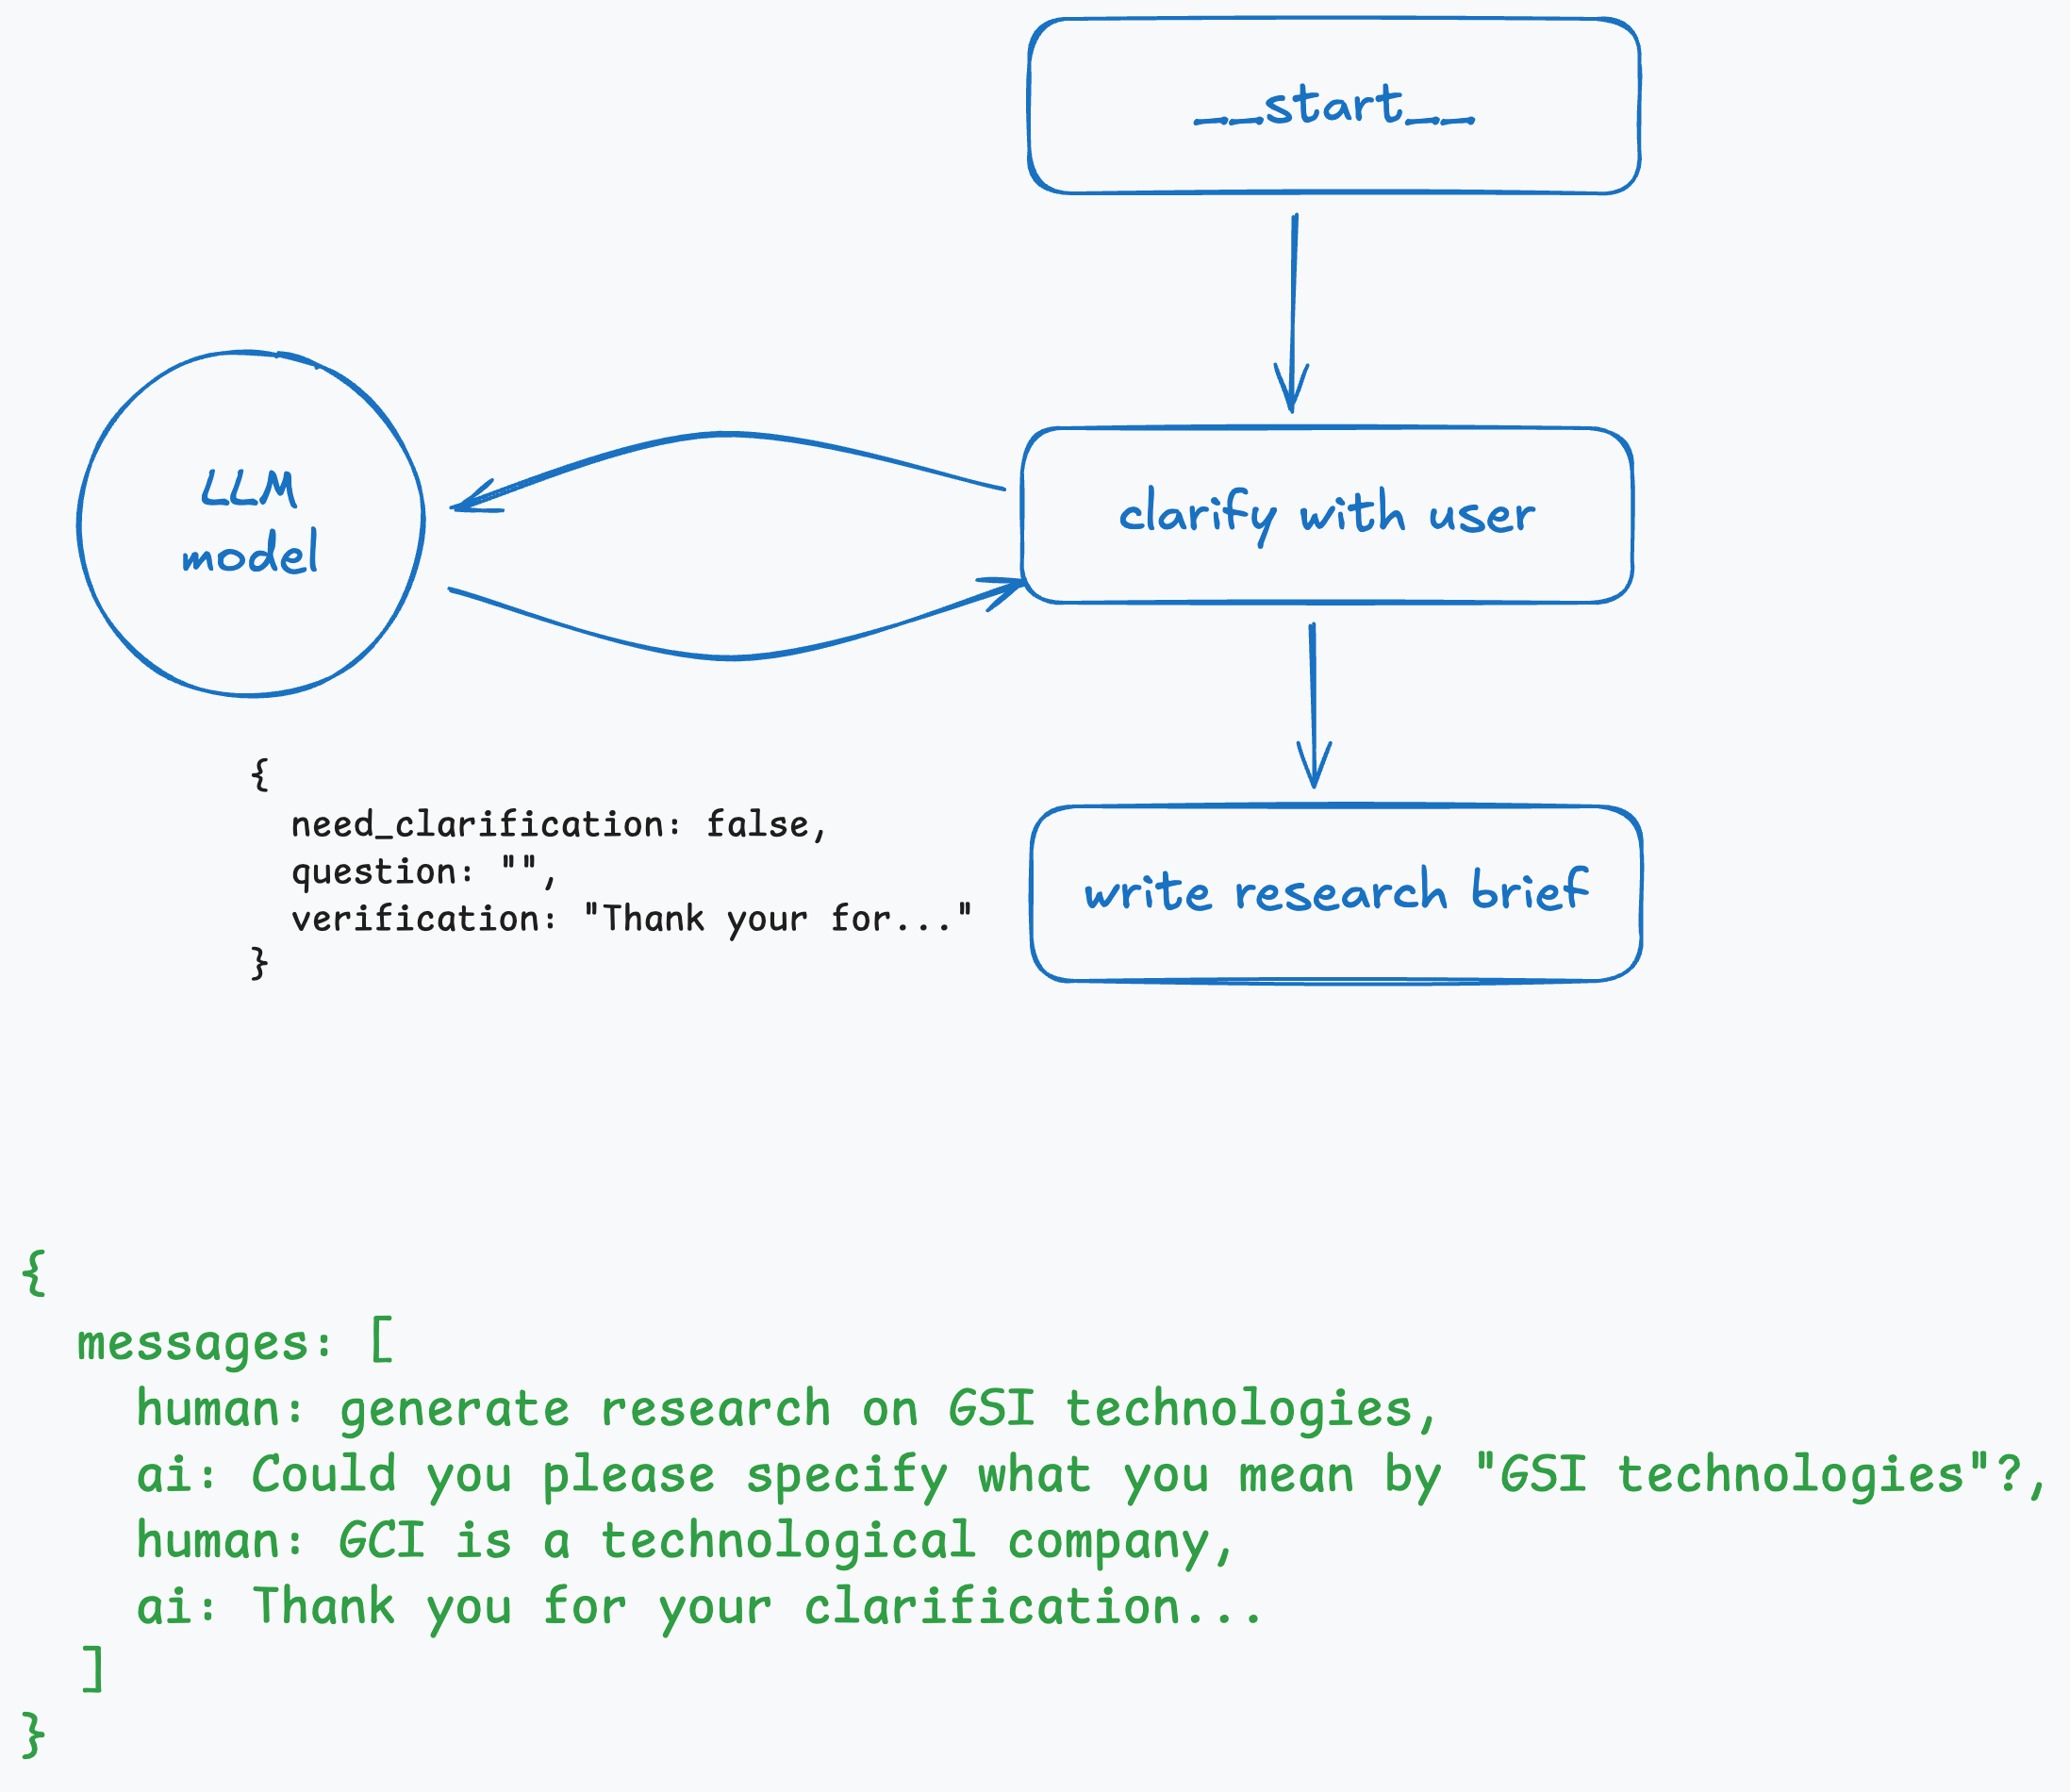
When a user replies, Open Deep Research performs another call to the LLM with the array of messages. It might ask for clarification again or return structured output with:
{
  need_verification: false,
  verification: “Thank you…”
}
where need_verification indicates whether we should proceed to the brief writer or not.
response = await clarification_model.ainvoke([HumanMessage(content=prompt_content)])
if response.need_clarification:
    # End with clarifying question for user
    return Command(
        goto=END,
        update={”messages”: [AIMessage(content=response.question)]}
    )
else:
    # Proceed to research with verification message
    return Command(
        goto=”write_research_brief”,
        update={”messages”: [AIMessage(content=response.verification)]}
    )
Step 3: Generate the Brief and Pass to Supervisor
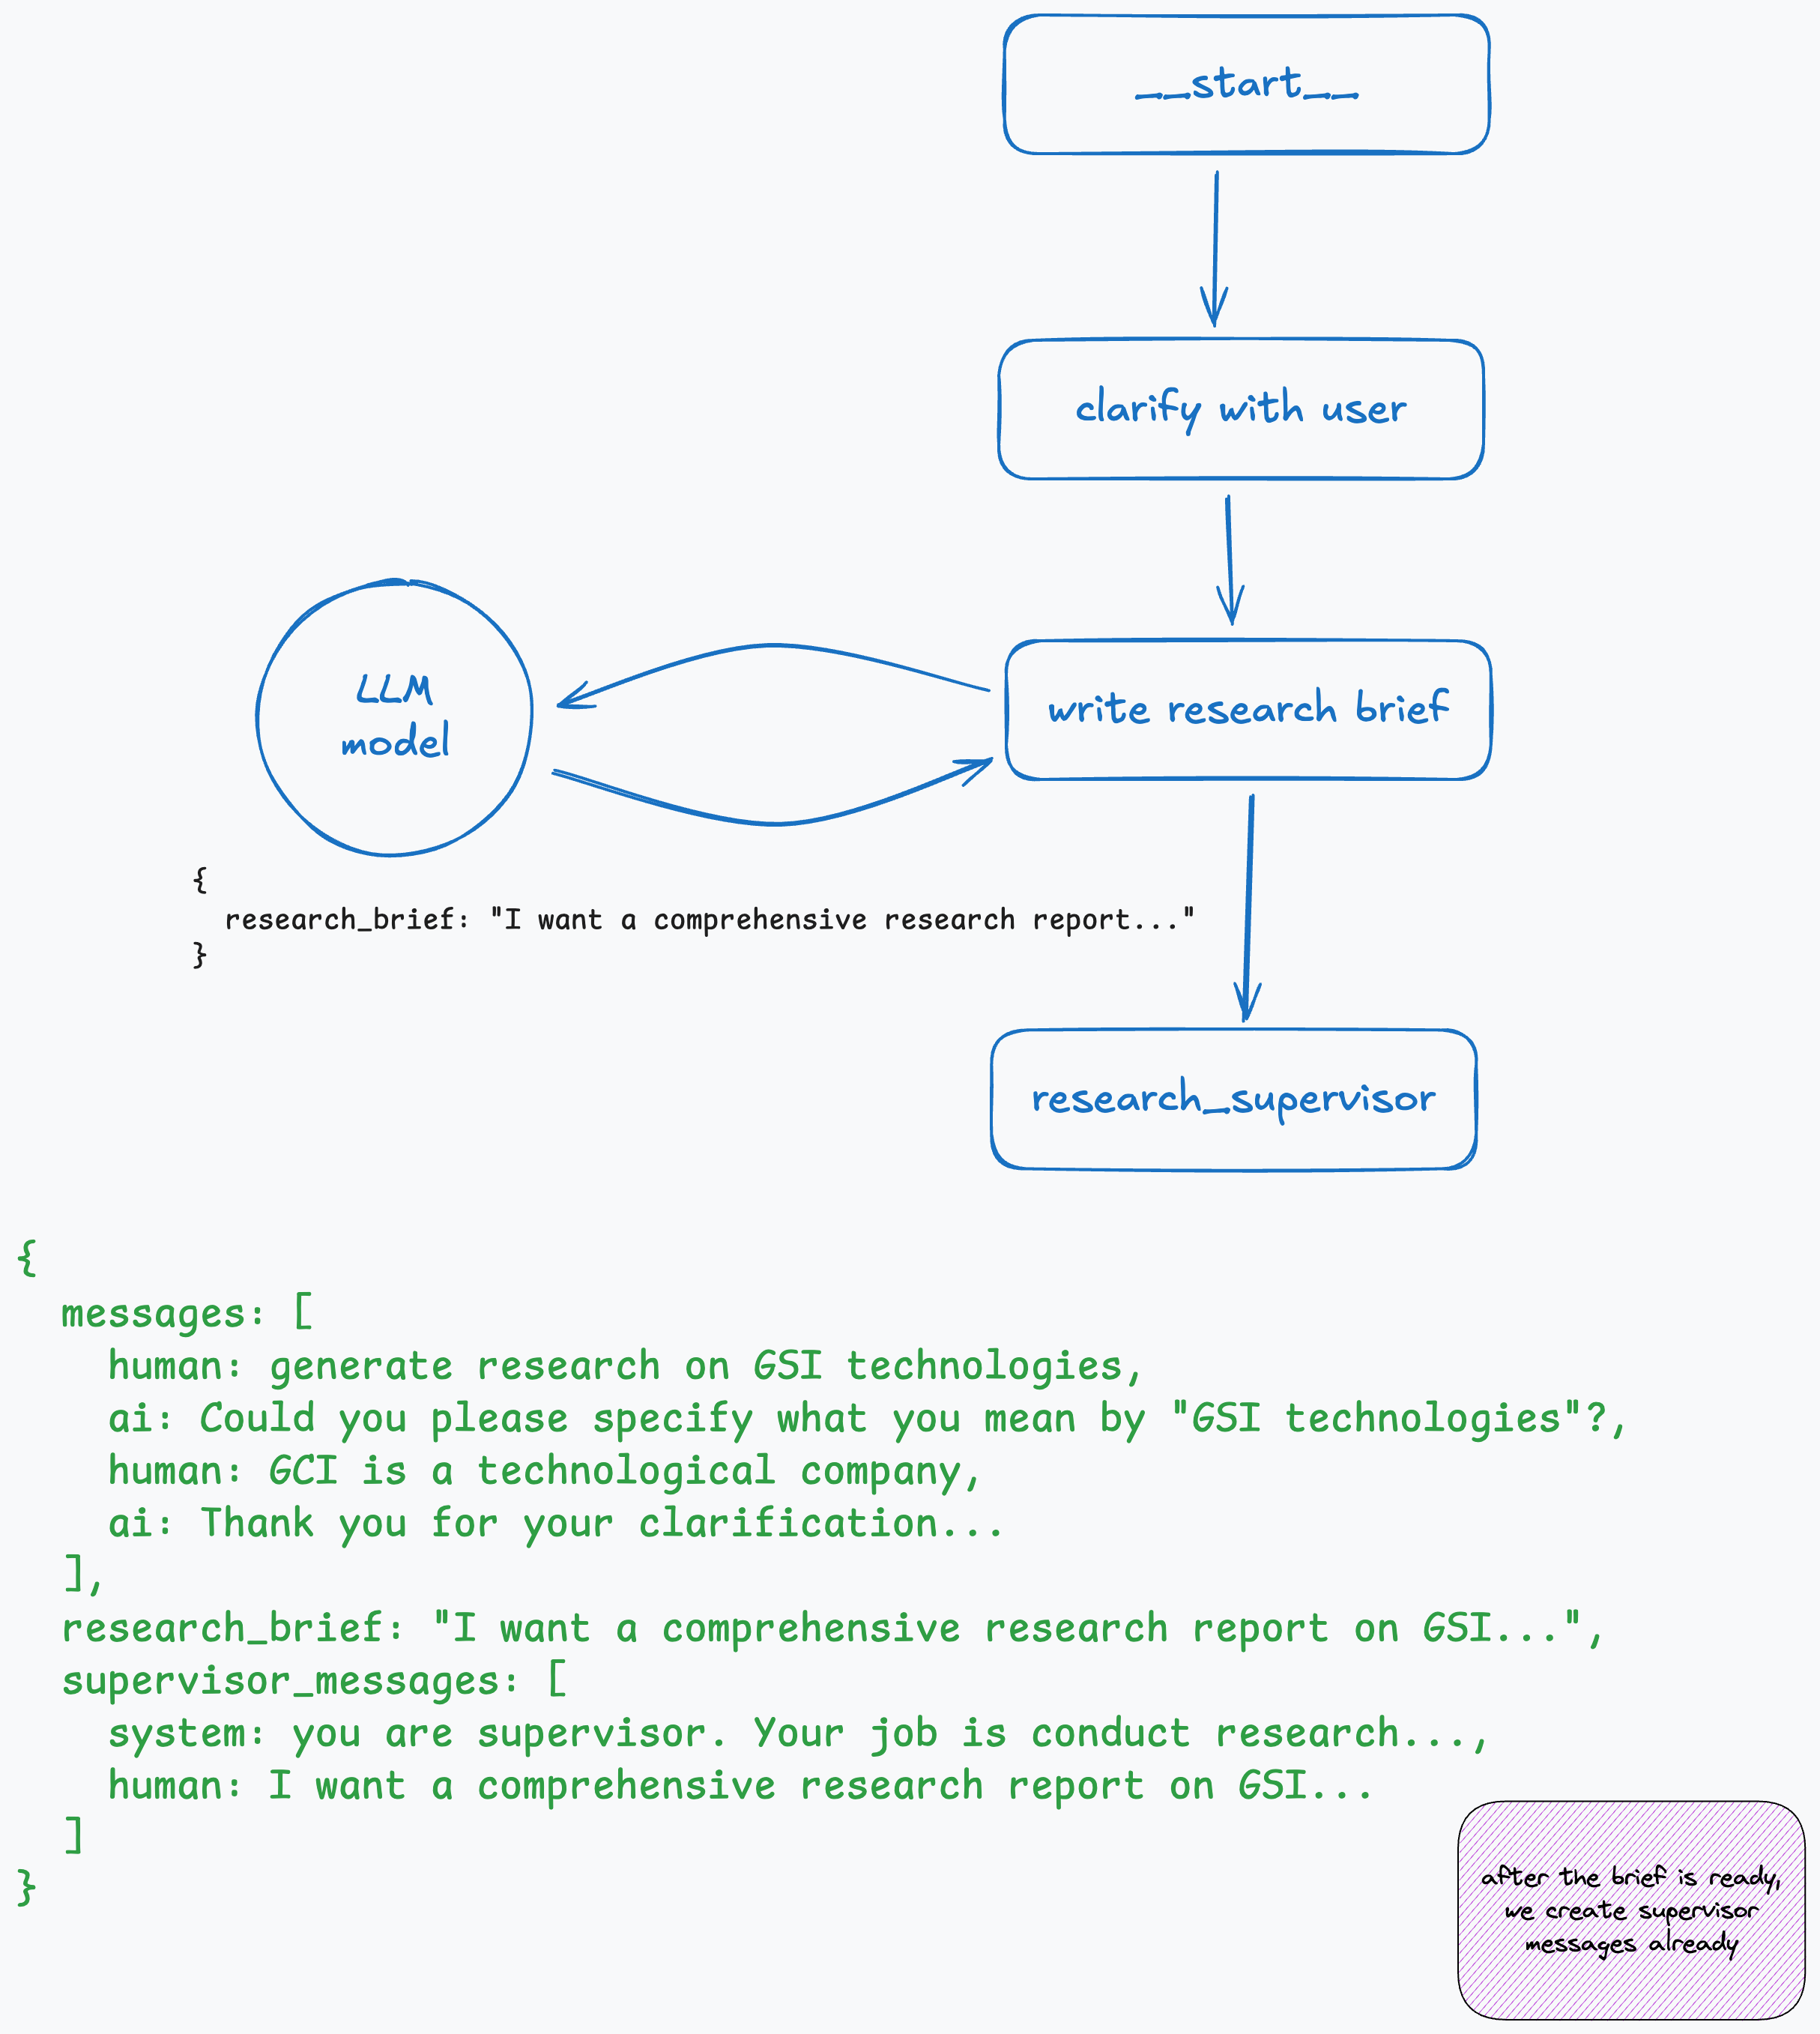
Now we make another call to the LLM with a different prompt to generate the research brief. The result we get back is stored in the state.
We also prepare the initial state for the supervisor subgraph. It’s stored in supervisor_messages inside the state and starts with the system prompt and the brief that was just generated.
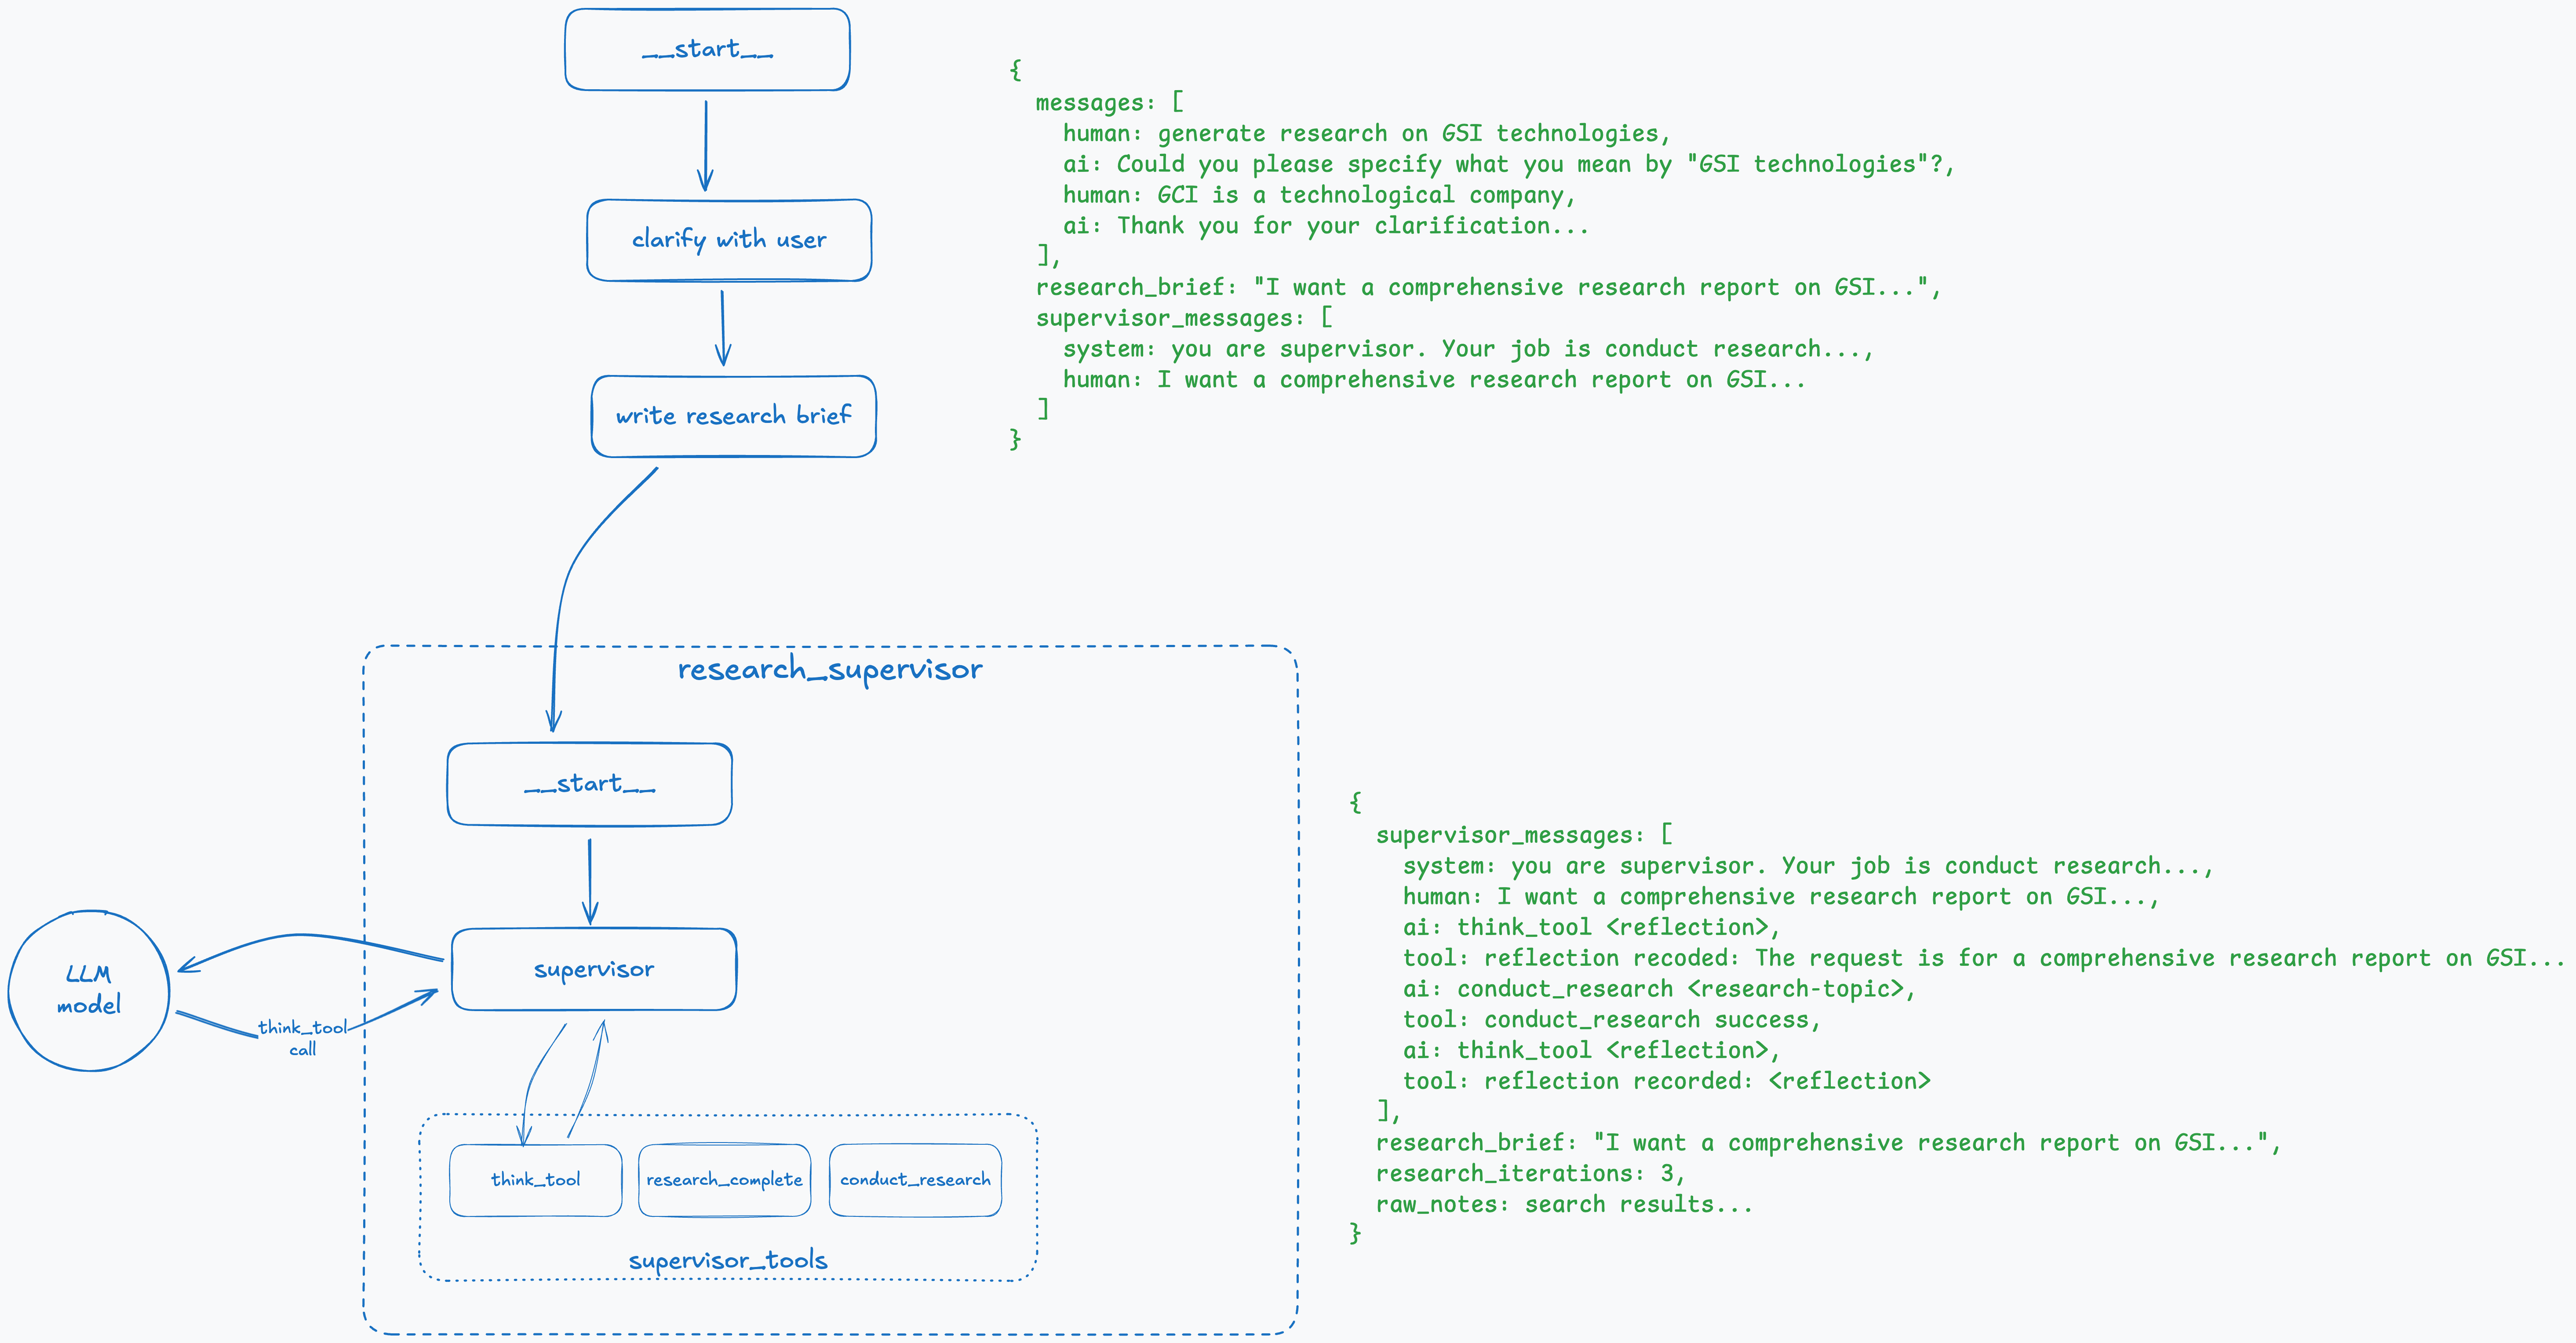
Step 4: Supervisor Reflects on the Brief

Now the complex part begins. The supervisor has its own system prompt and three tool definitions: think_tool, conduct_research, and research_complete. It’s important to point out the pattern we described earlier—these are just definitions without actual implementations. The supervisor node listens to LLM calls and performs tool calls itself.
It starts with a call to the think_tool (reflection pattern) to understand what it should do, and the result is stored in supervisor_messages. The supervisor also checks the number of calls (research_iterations) it has made and stops if it exceeds the predefined maximum; otherwise, the research could continue indefinitely.
Step 5: Supervisor Initiates the Research
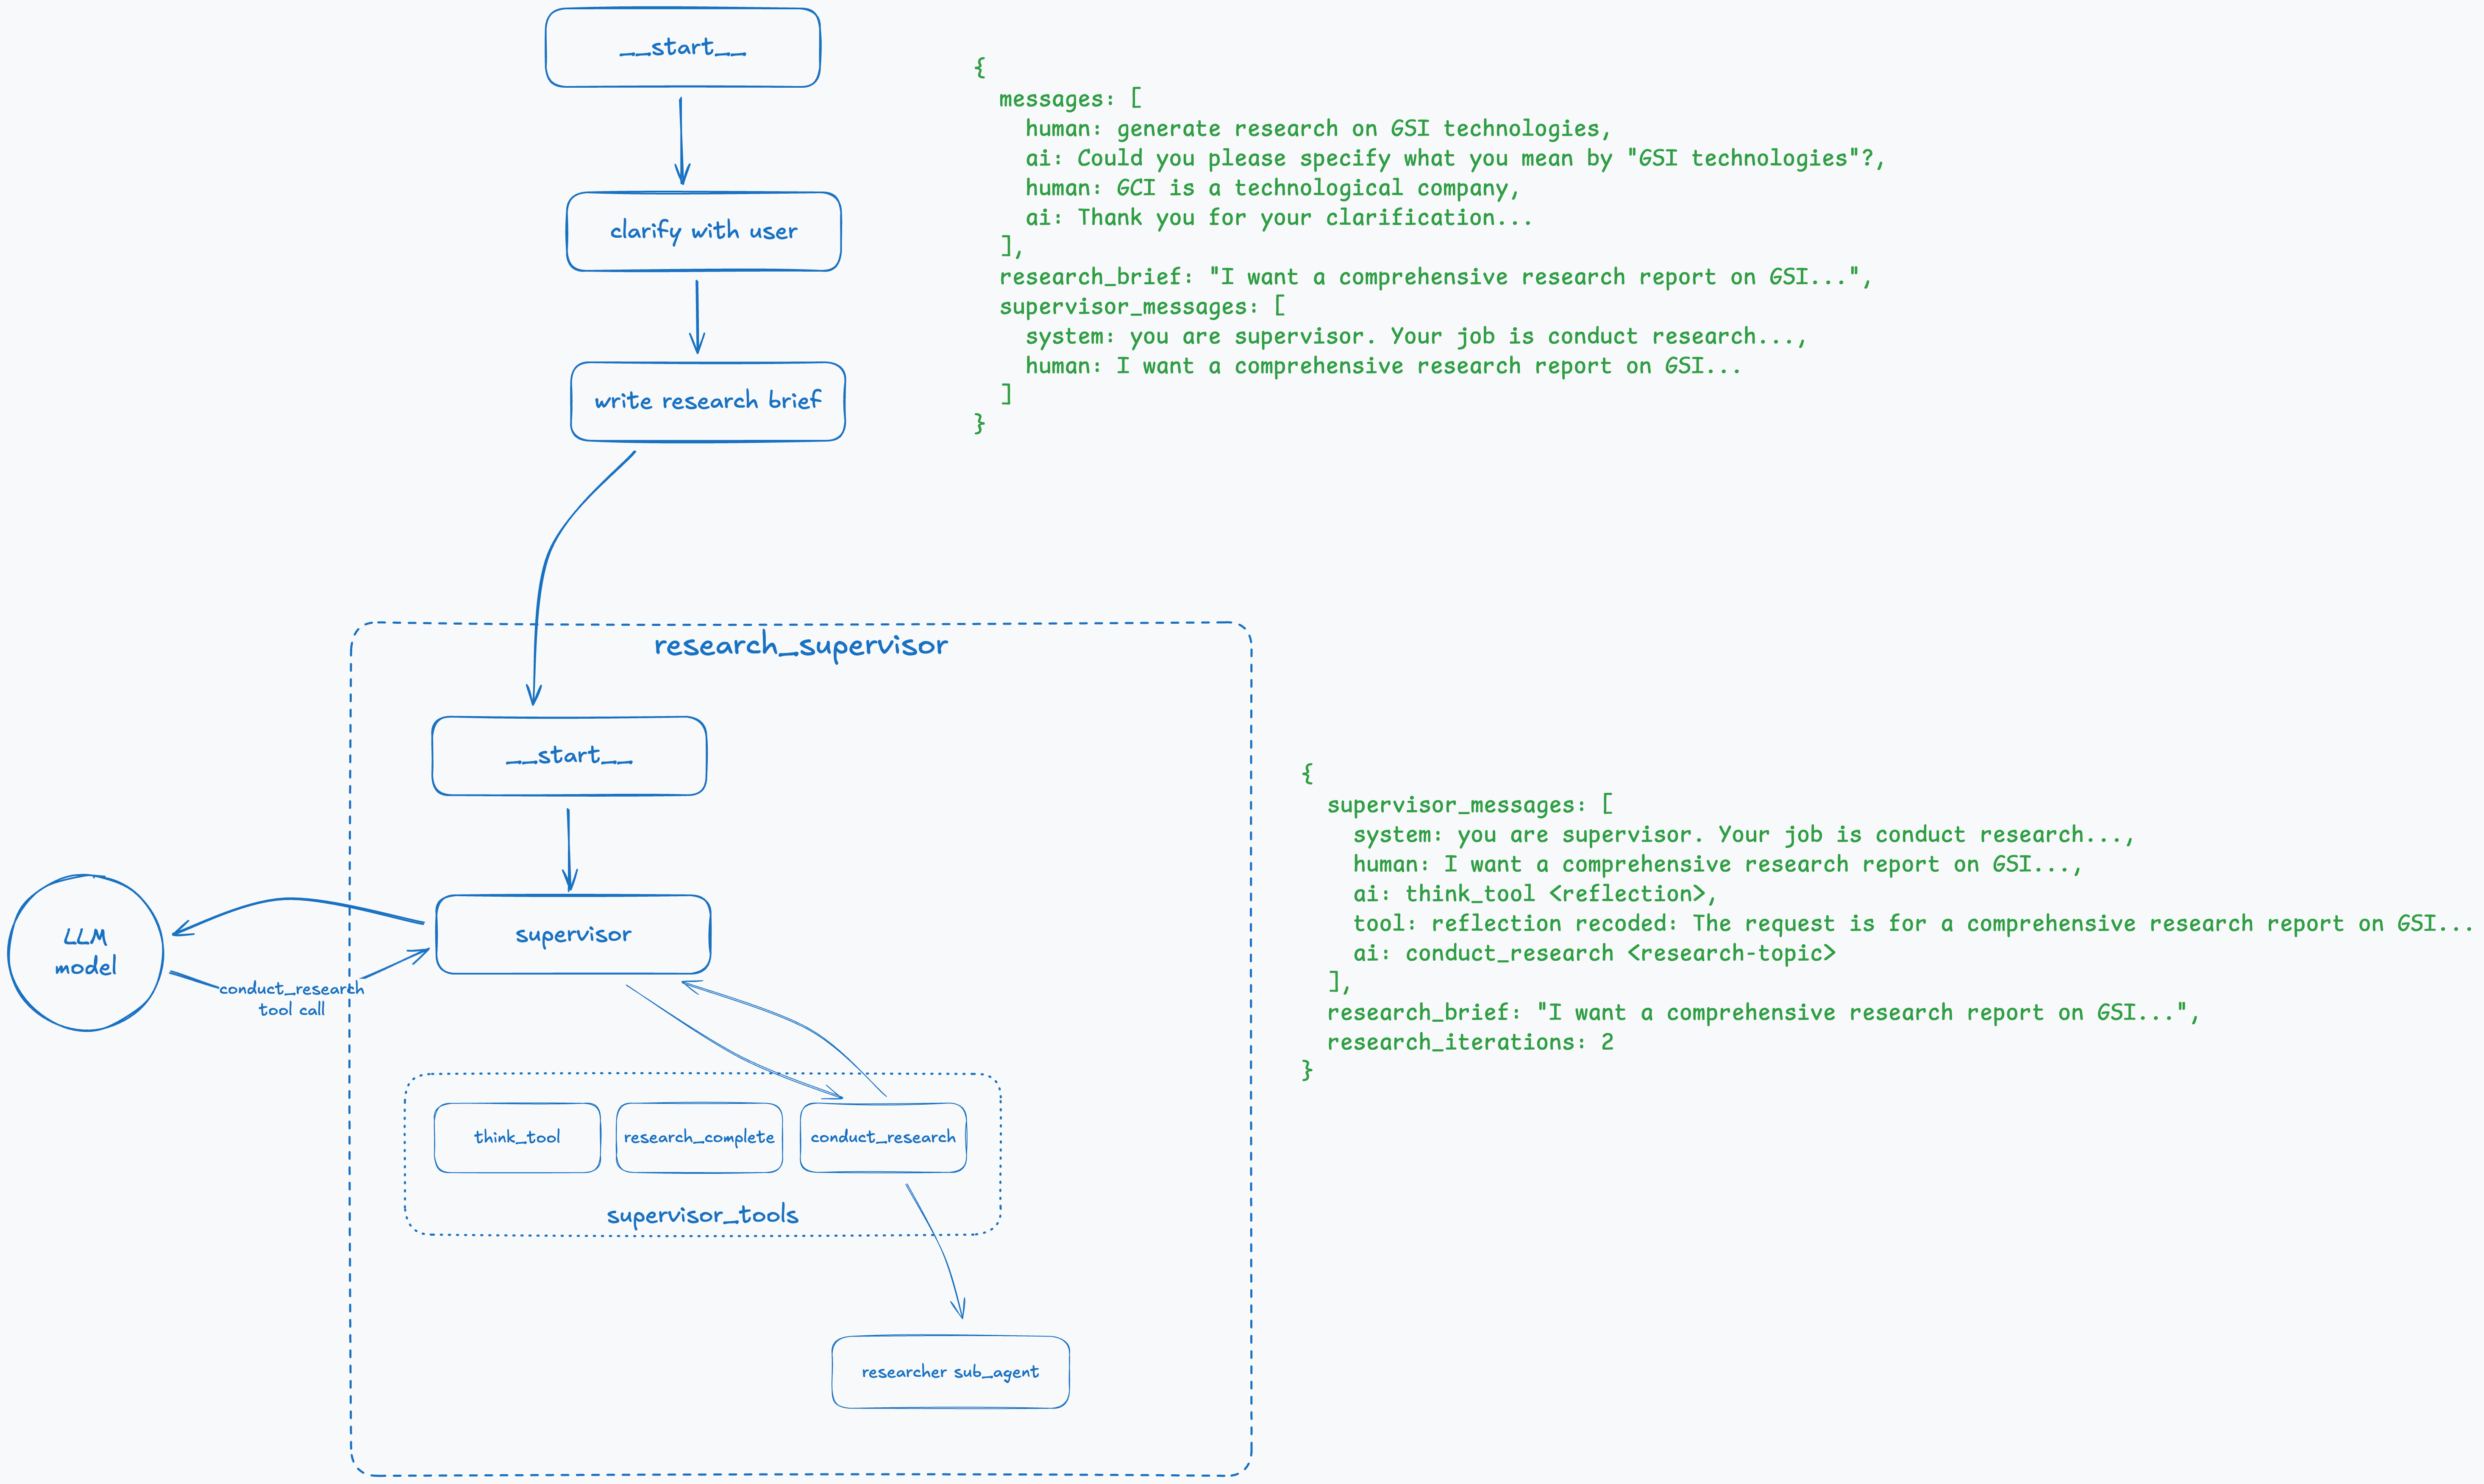
When the first reflection is recorded, the supervisor makes a call to the LLM, which returns a call to the conduct_research tool with the topic. It might return several conduct_research tools; in that case, the supervisor will spawn multiple sub-agents in parallel, each with a dedicated topic.
Step 6: Initiate Research Sub-Agent
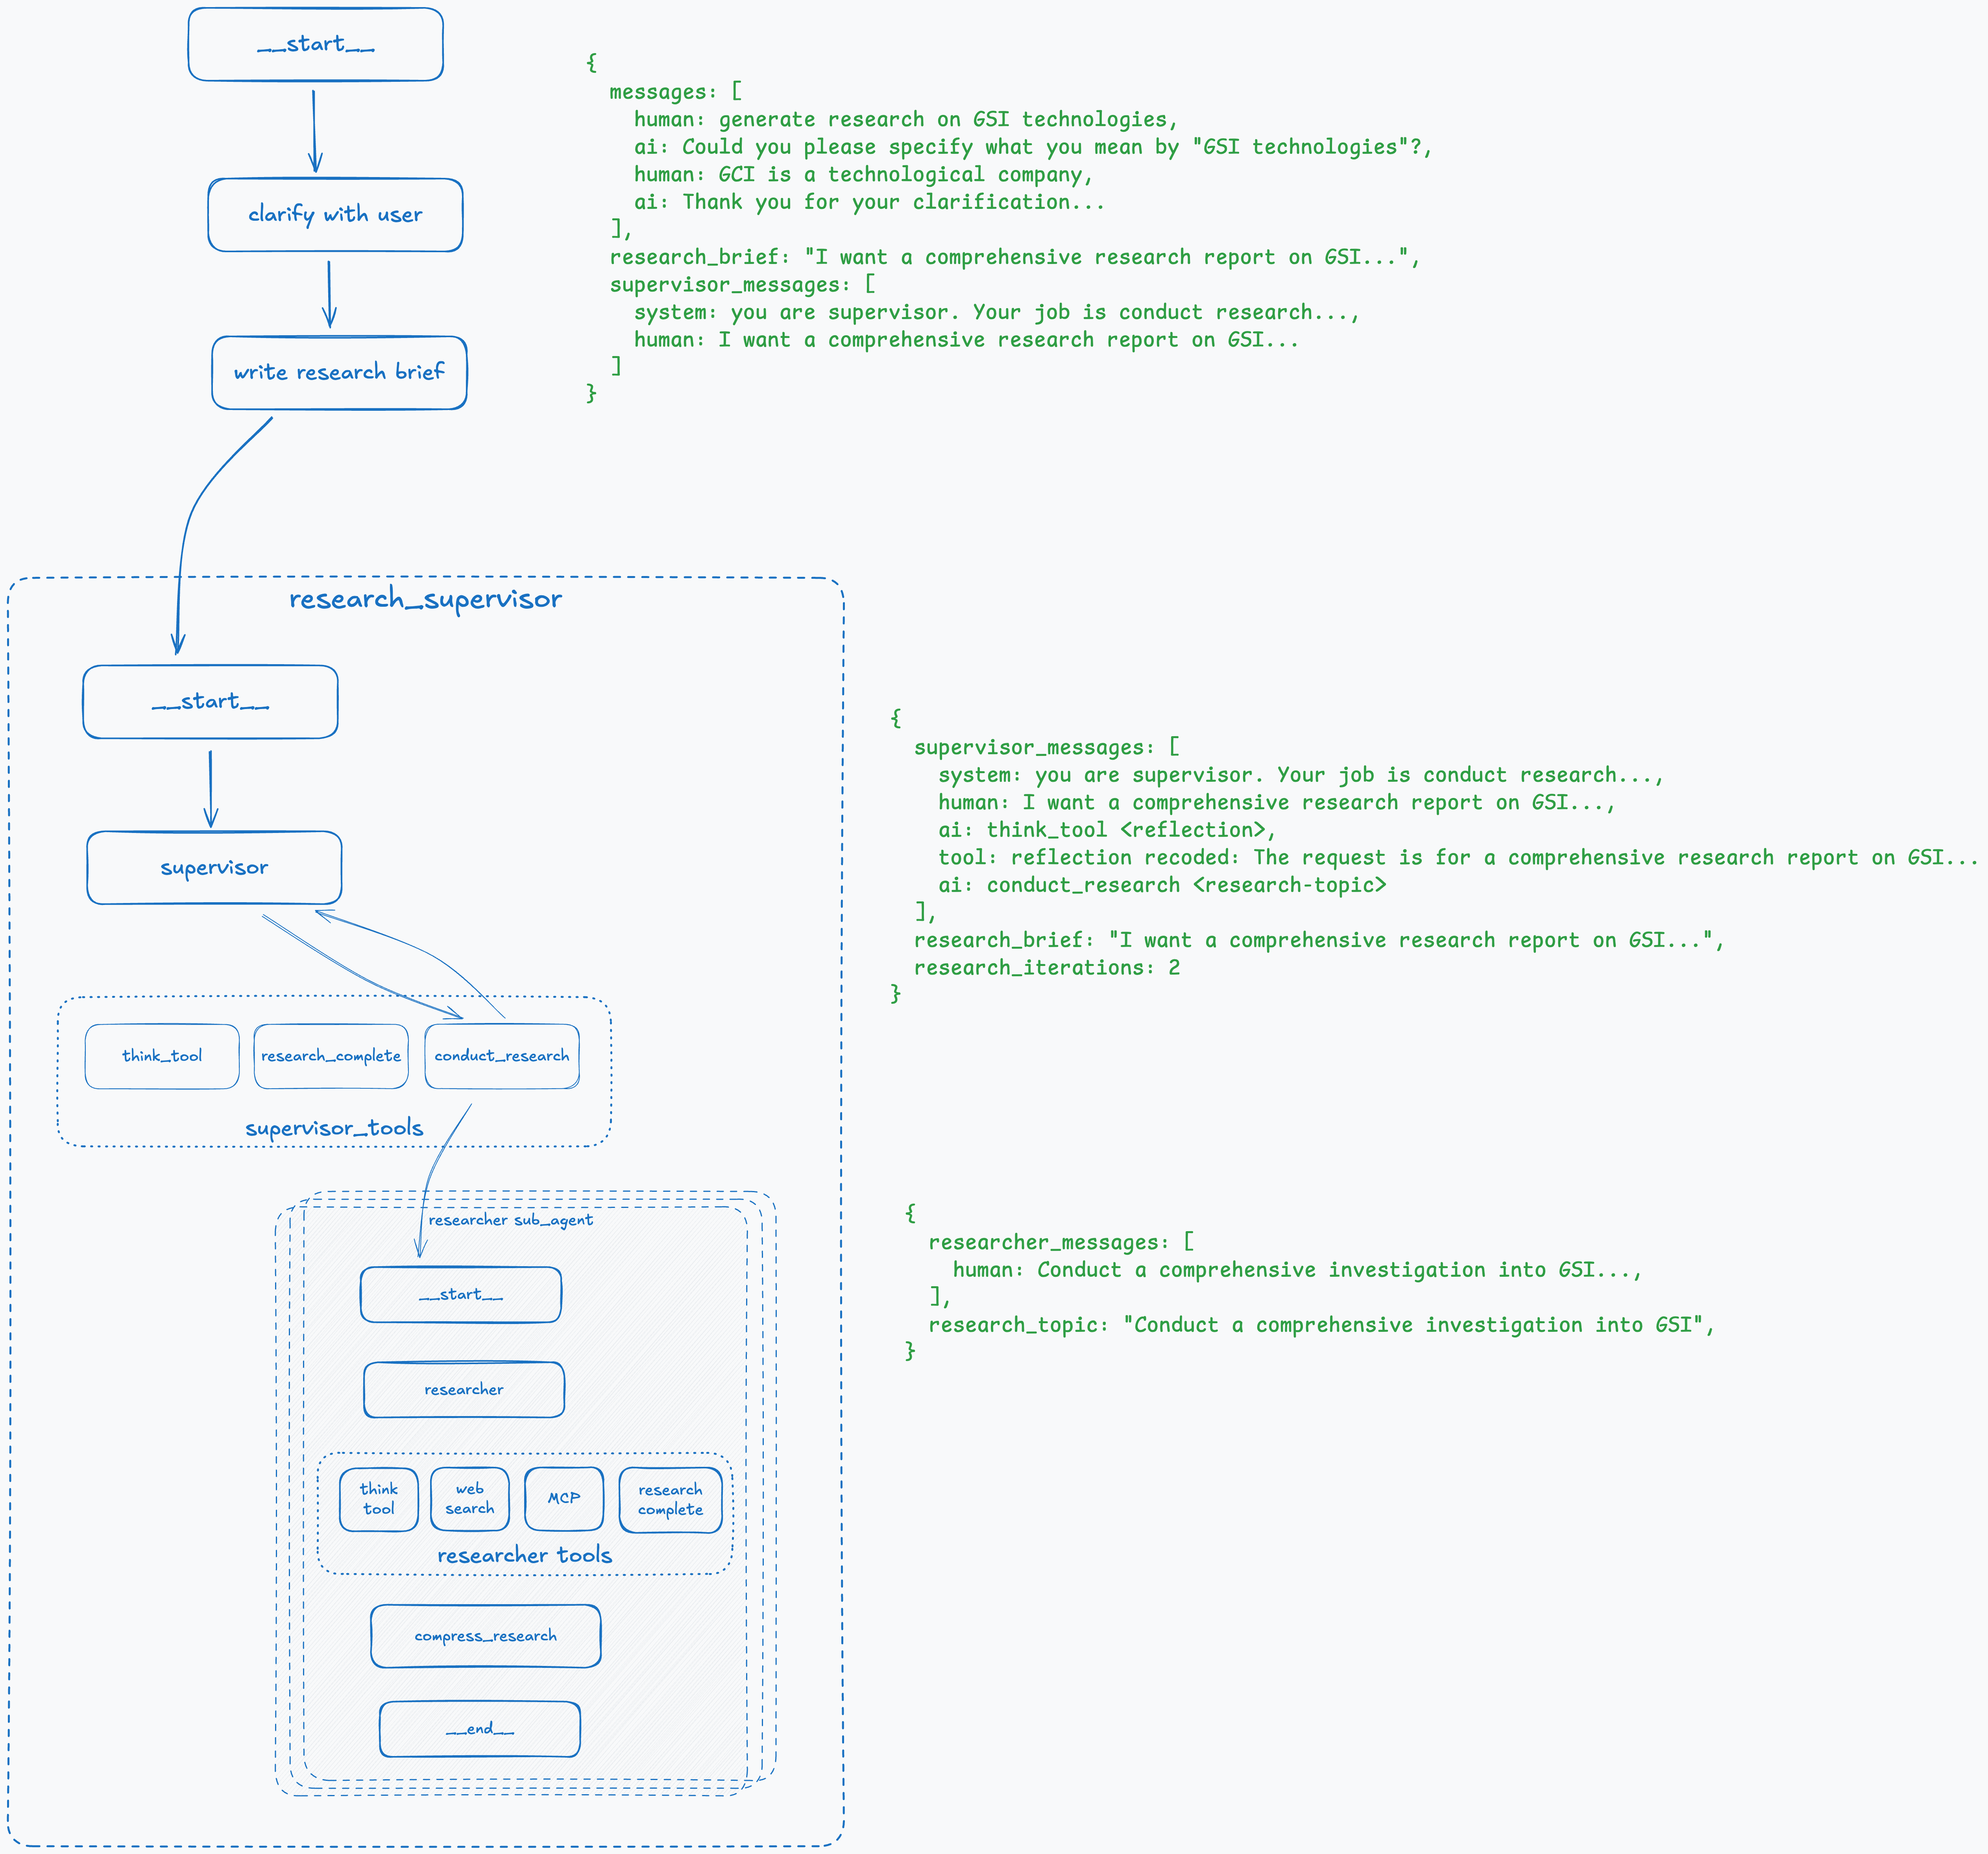
The research sub-agent is a subgraph that is invoked dynamically based on the LLM response from the conduct_research tool; therefore, it’s not visible in LangGraph Studio. It consists of three main nodes: researcher, research_tools, and compress_research. Research tools can be configured but generally include think_tool with the same logic as the supervisor tool, search, MCP servers, and the research_complete tool. As a subgraph, it has its own state with messages and research_topic that it received from the supervisor. Similar to the supervisor, each tool call is tracked in the state and capped by the maximum number of iterations.
Step 7: Research Agent Initiates the Search
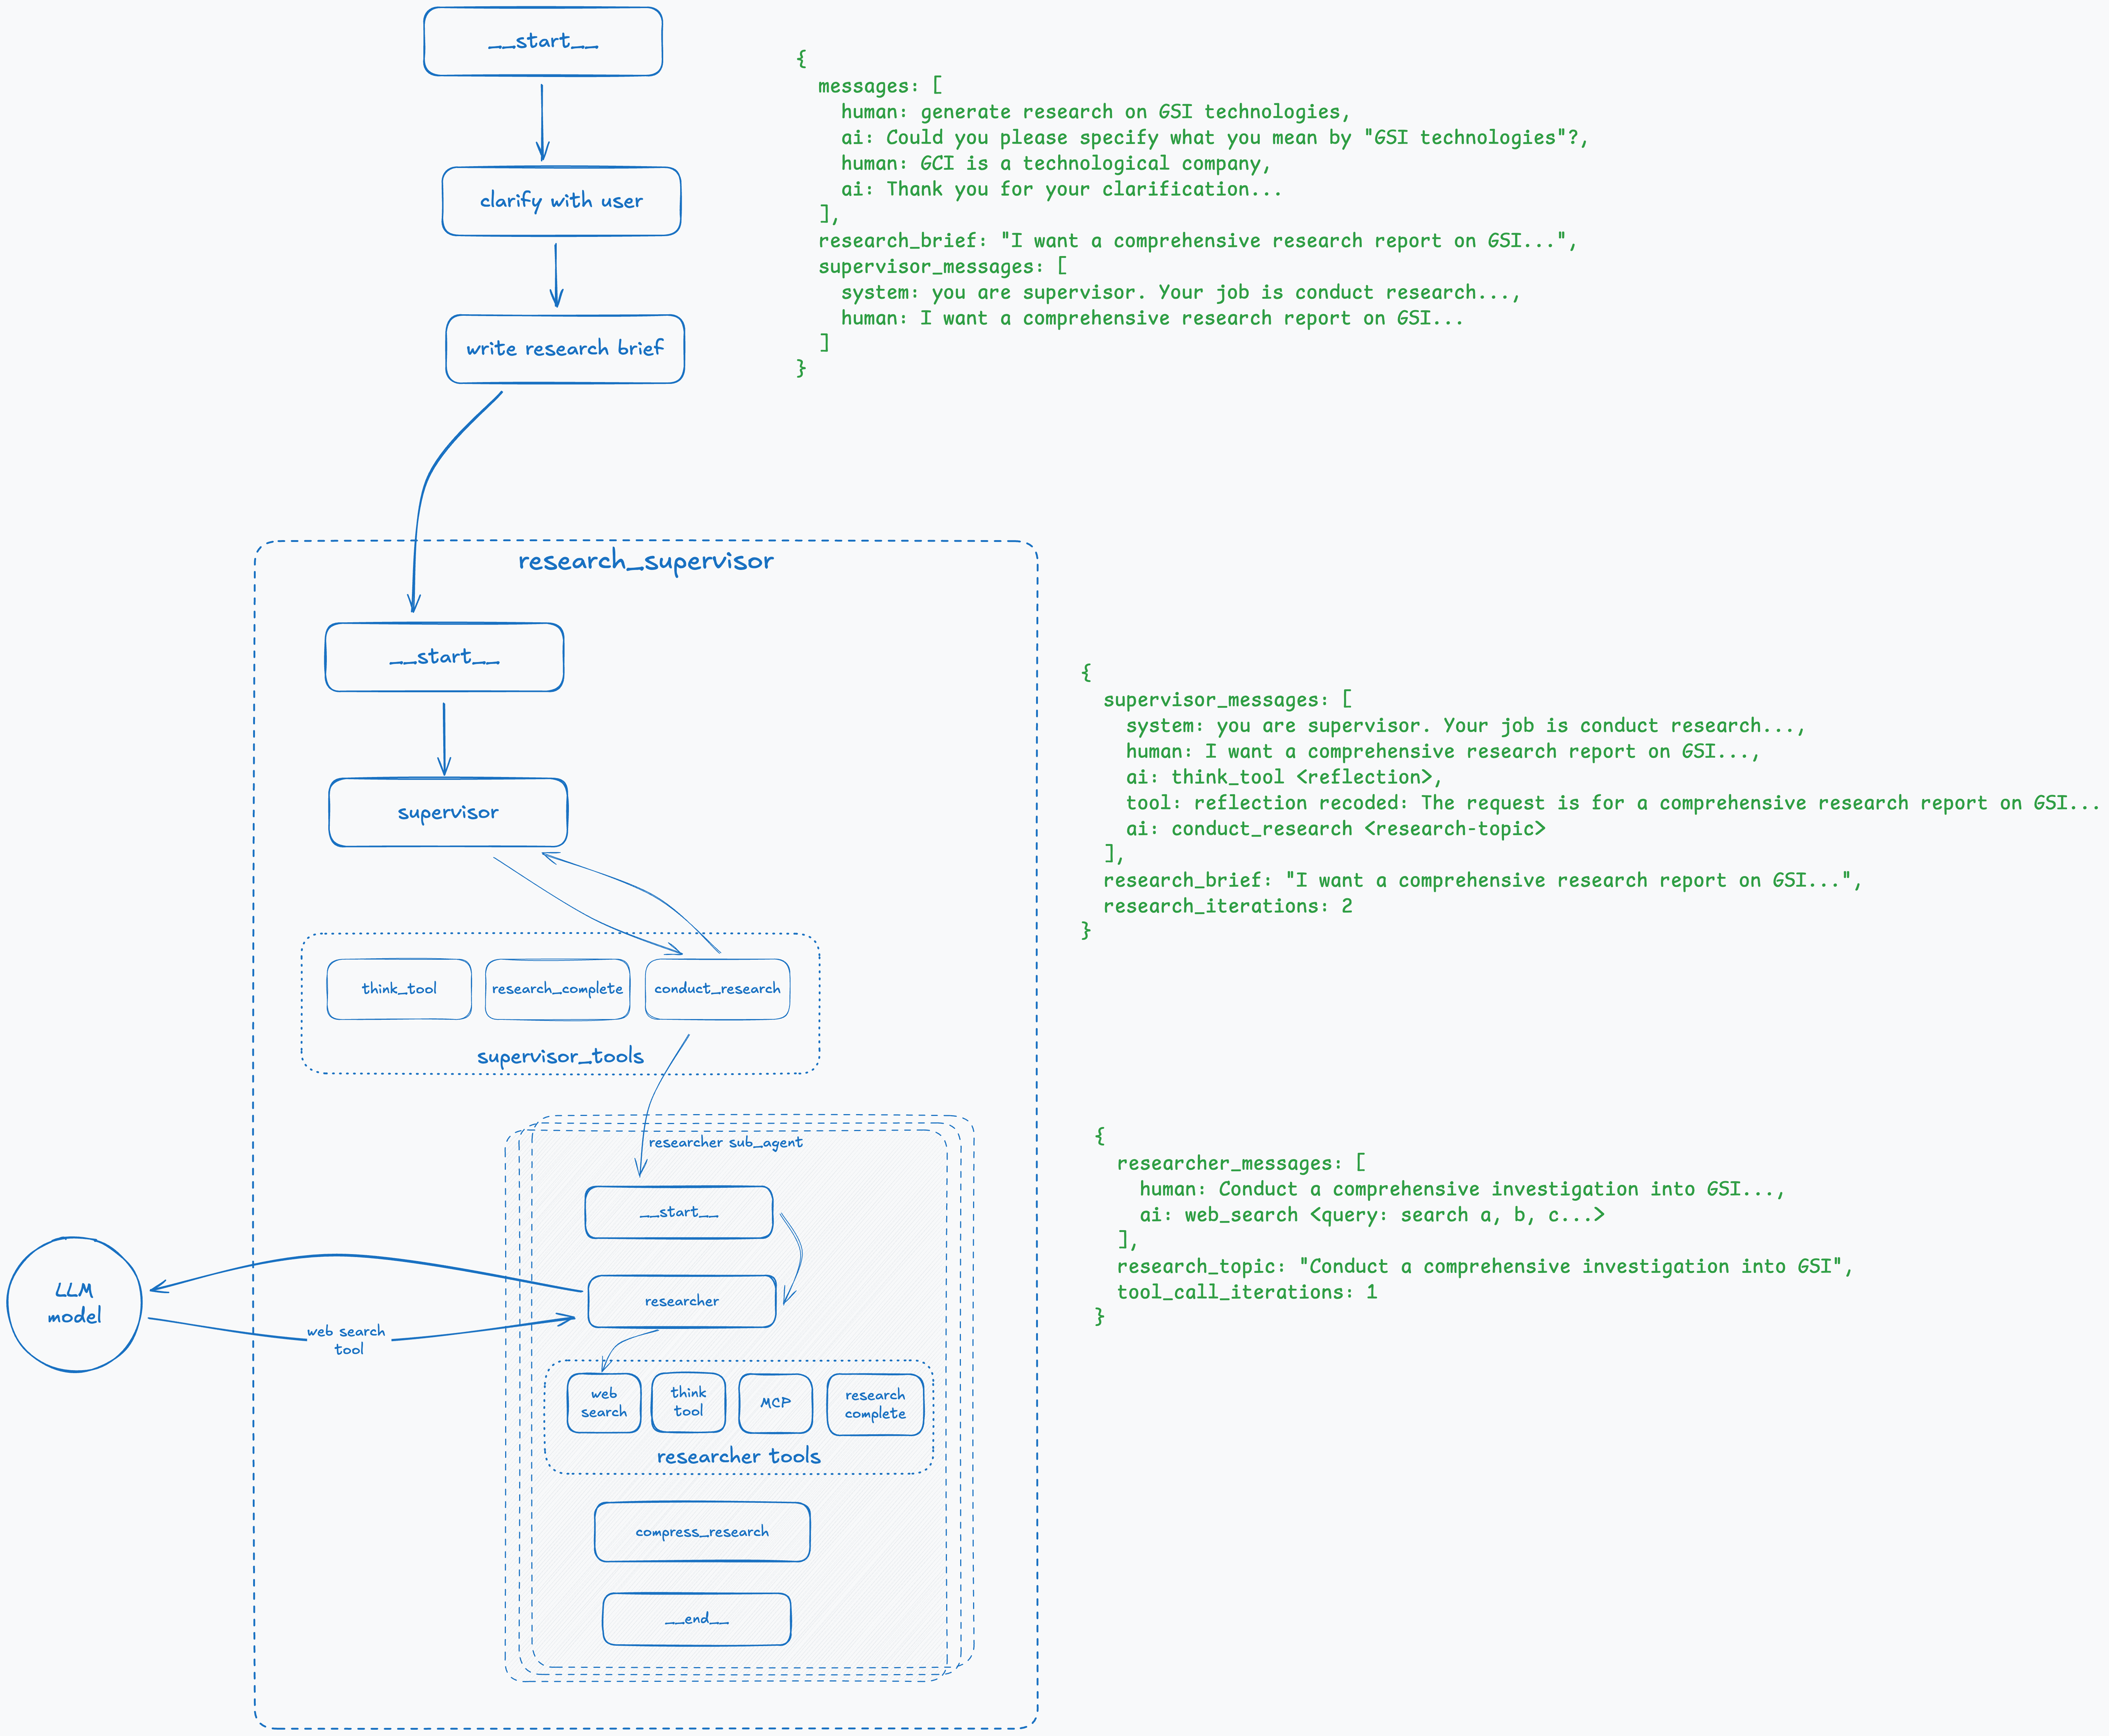
This step is straightforward. The research node makes an LLM call with the system prompt and the research topic it received from the supervisor. It receives back a tool call to web_search with an array of queries that it should perform.
Step 8: Research Agent Performs Multiple Searches
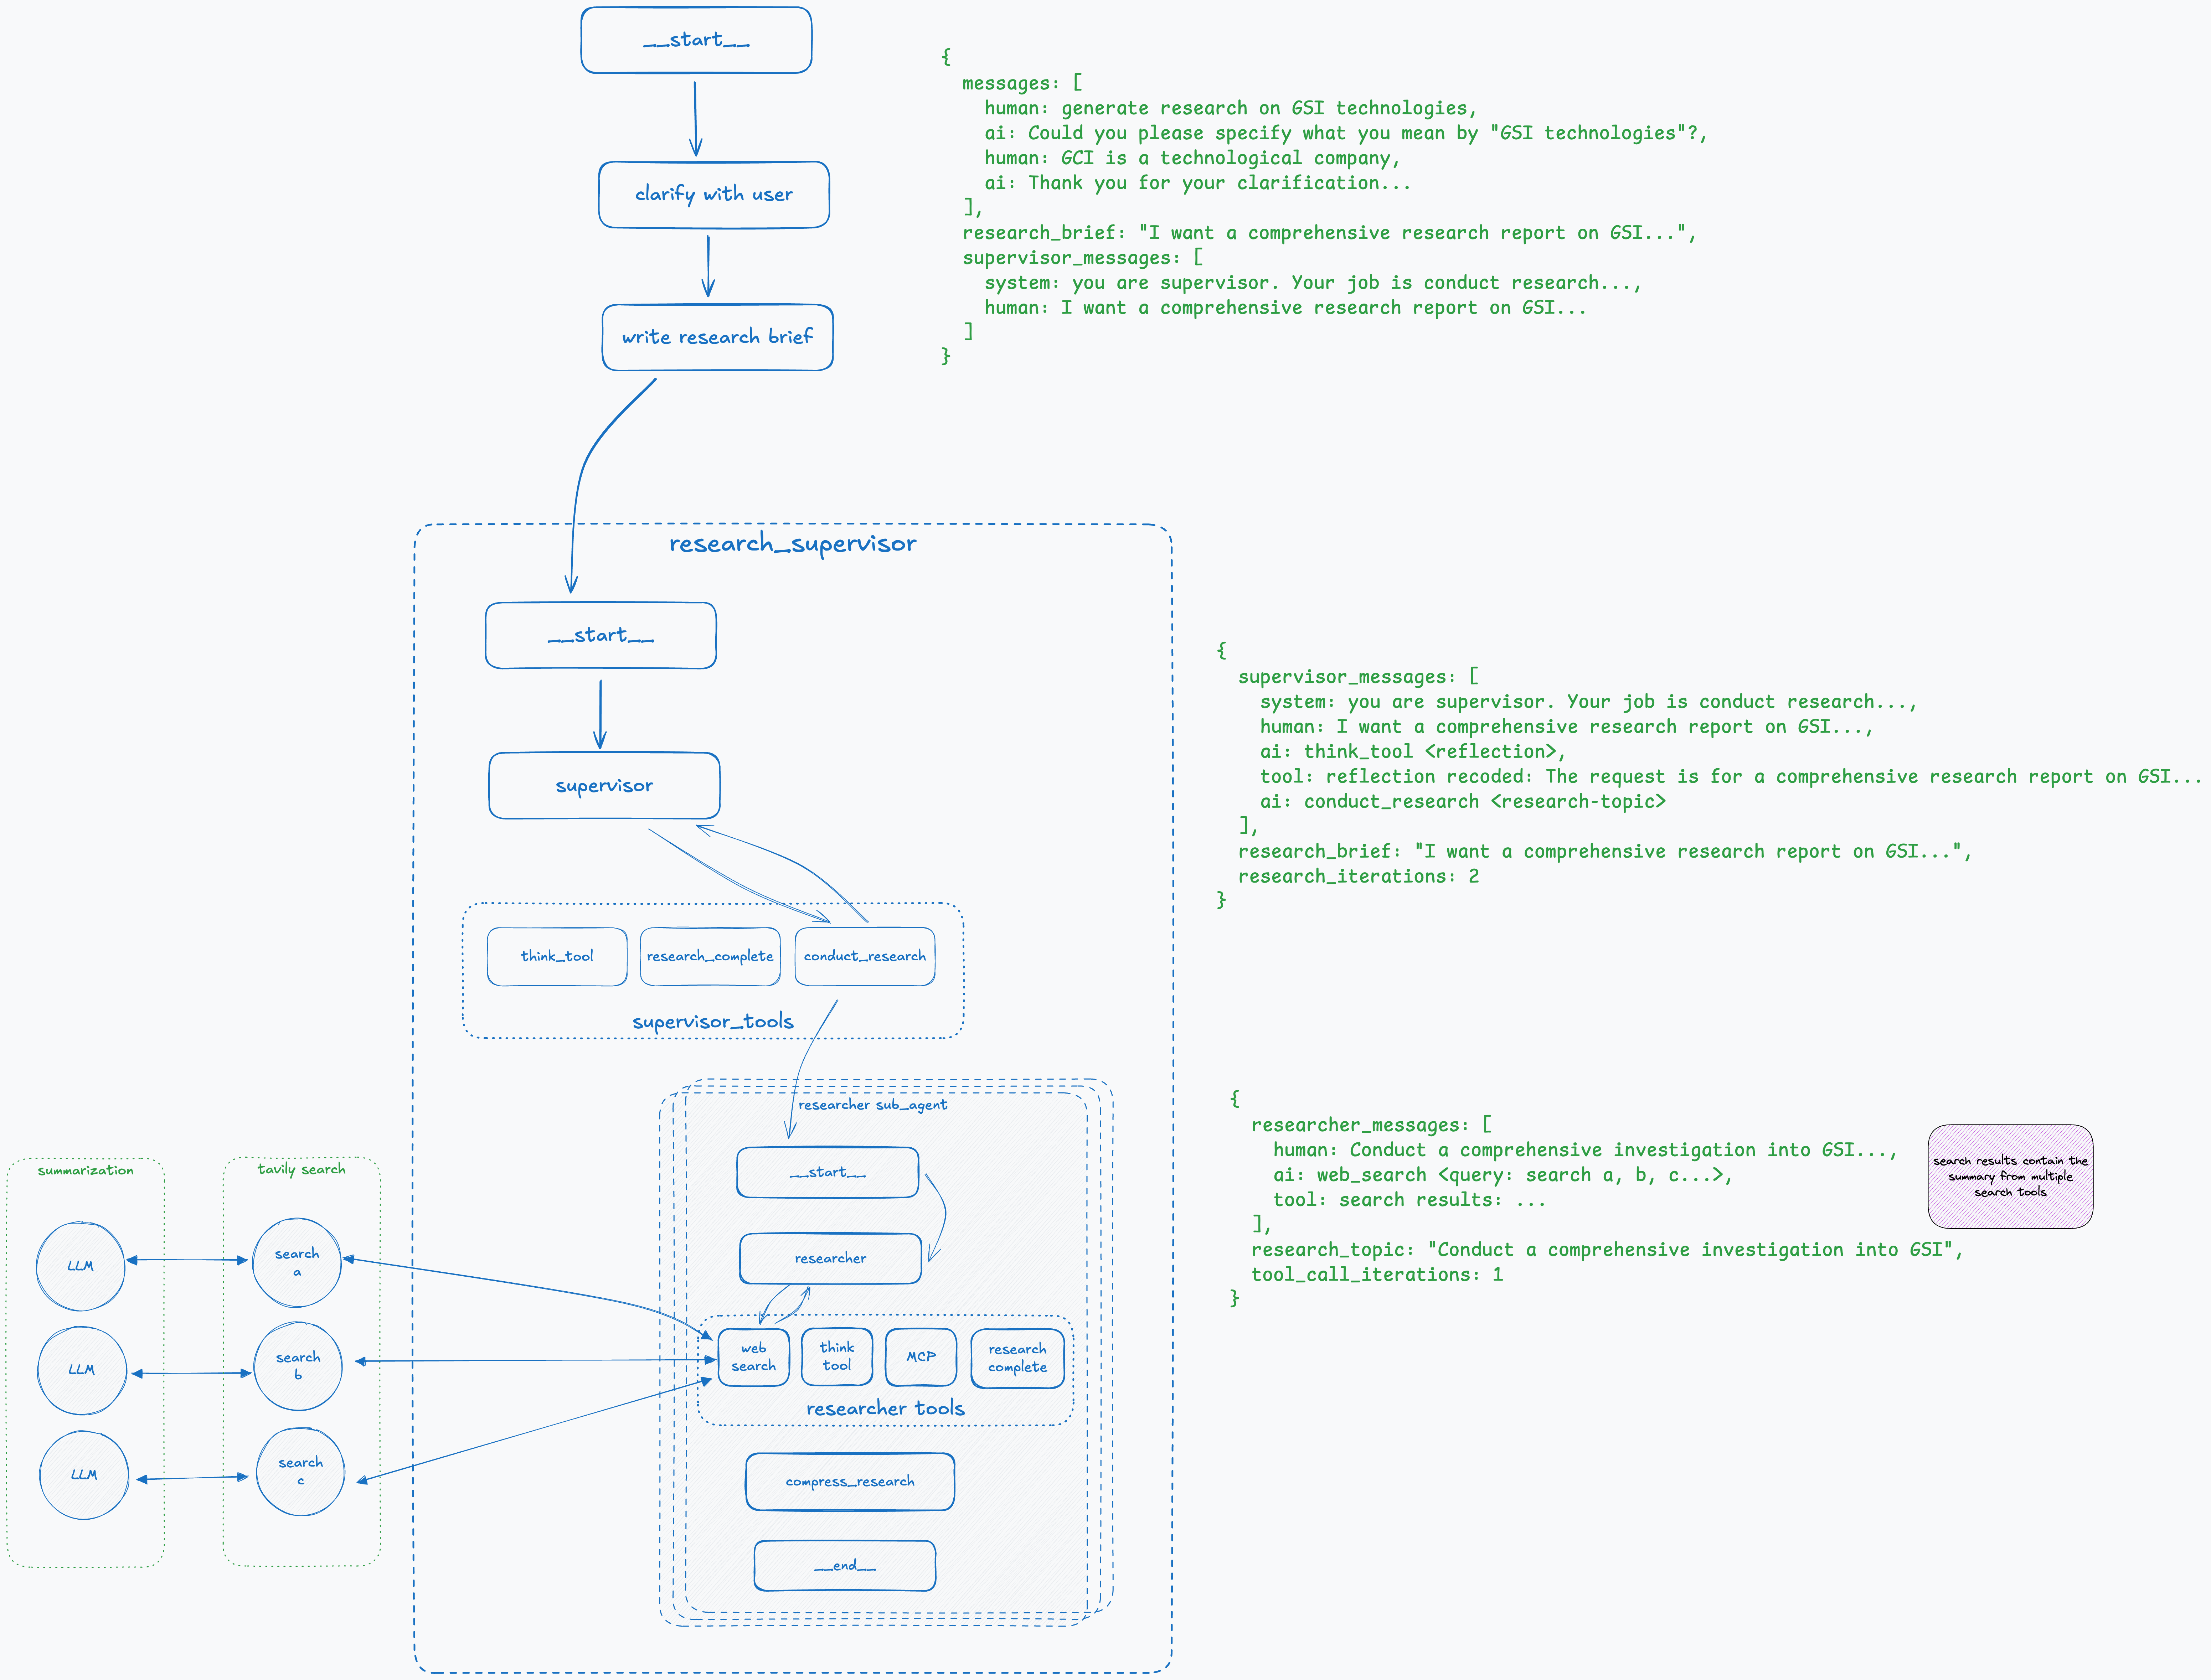
Open Deep Research uses Tavily search and spawns several searches in parallel, one for each query it received from the researcher node. Given that search results can be large, before the search tool returns the results, they are summarized and then stored in researchers_messages in the state.
Step 9: Reflect on Research Results
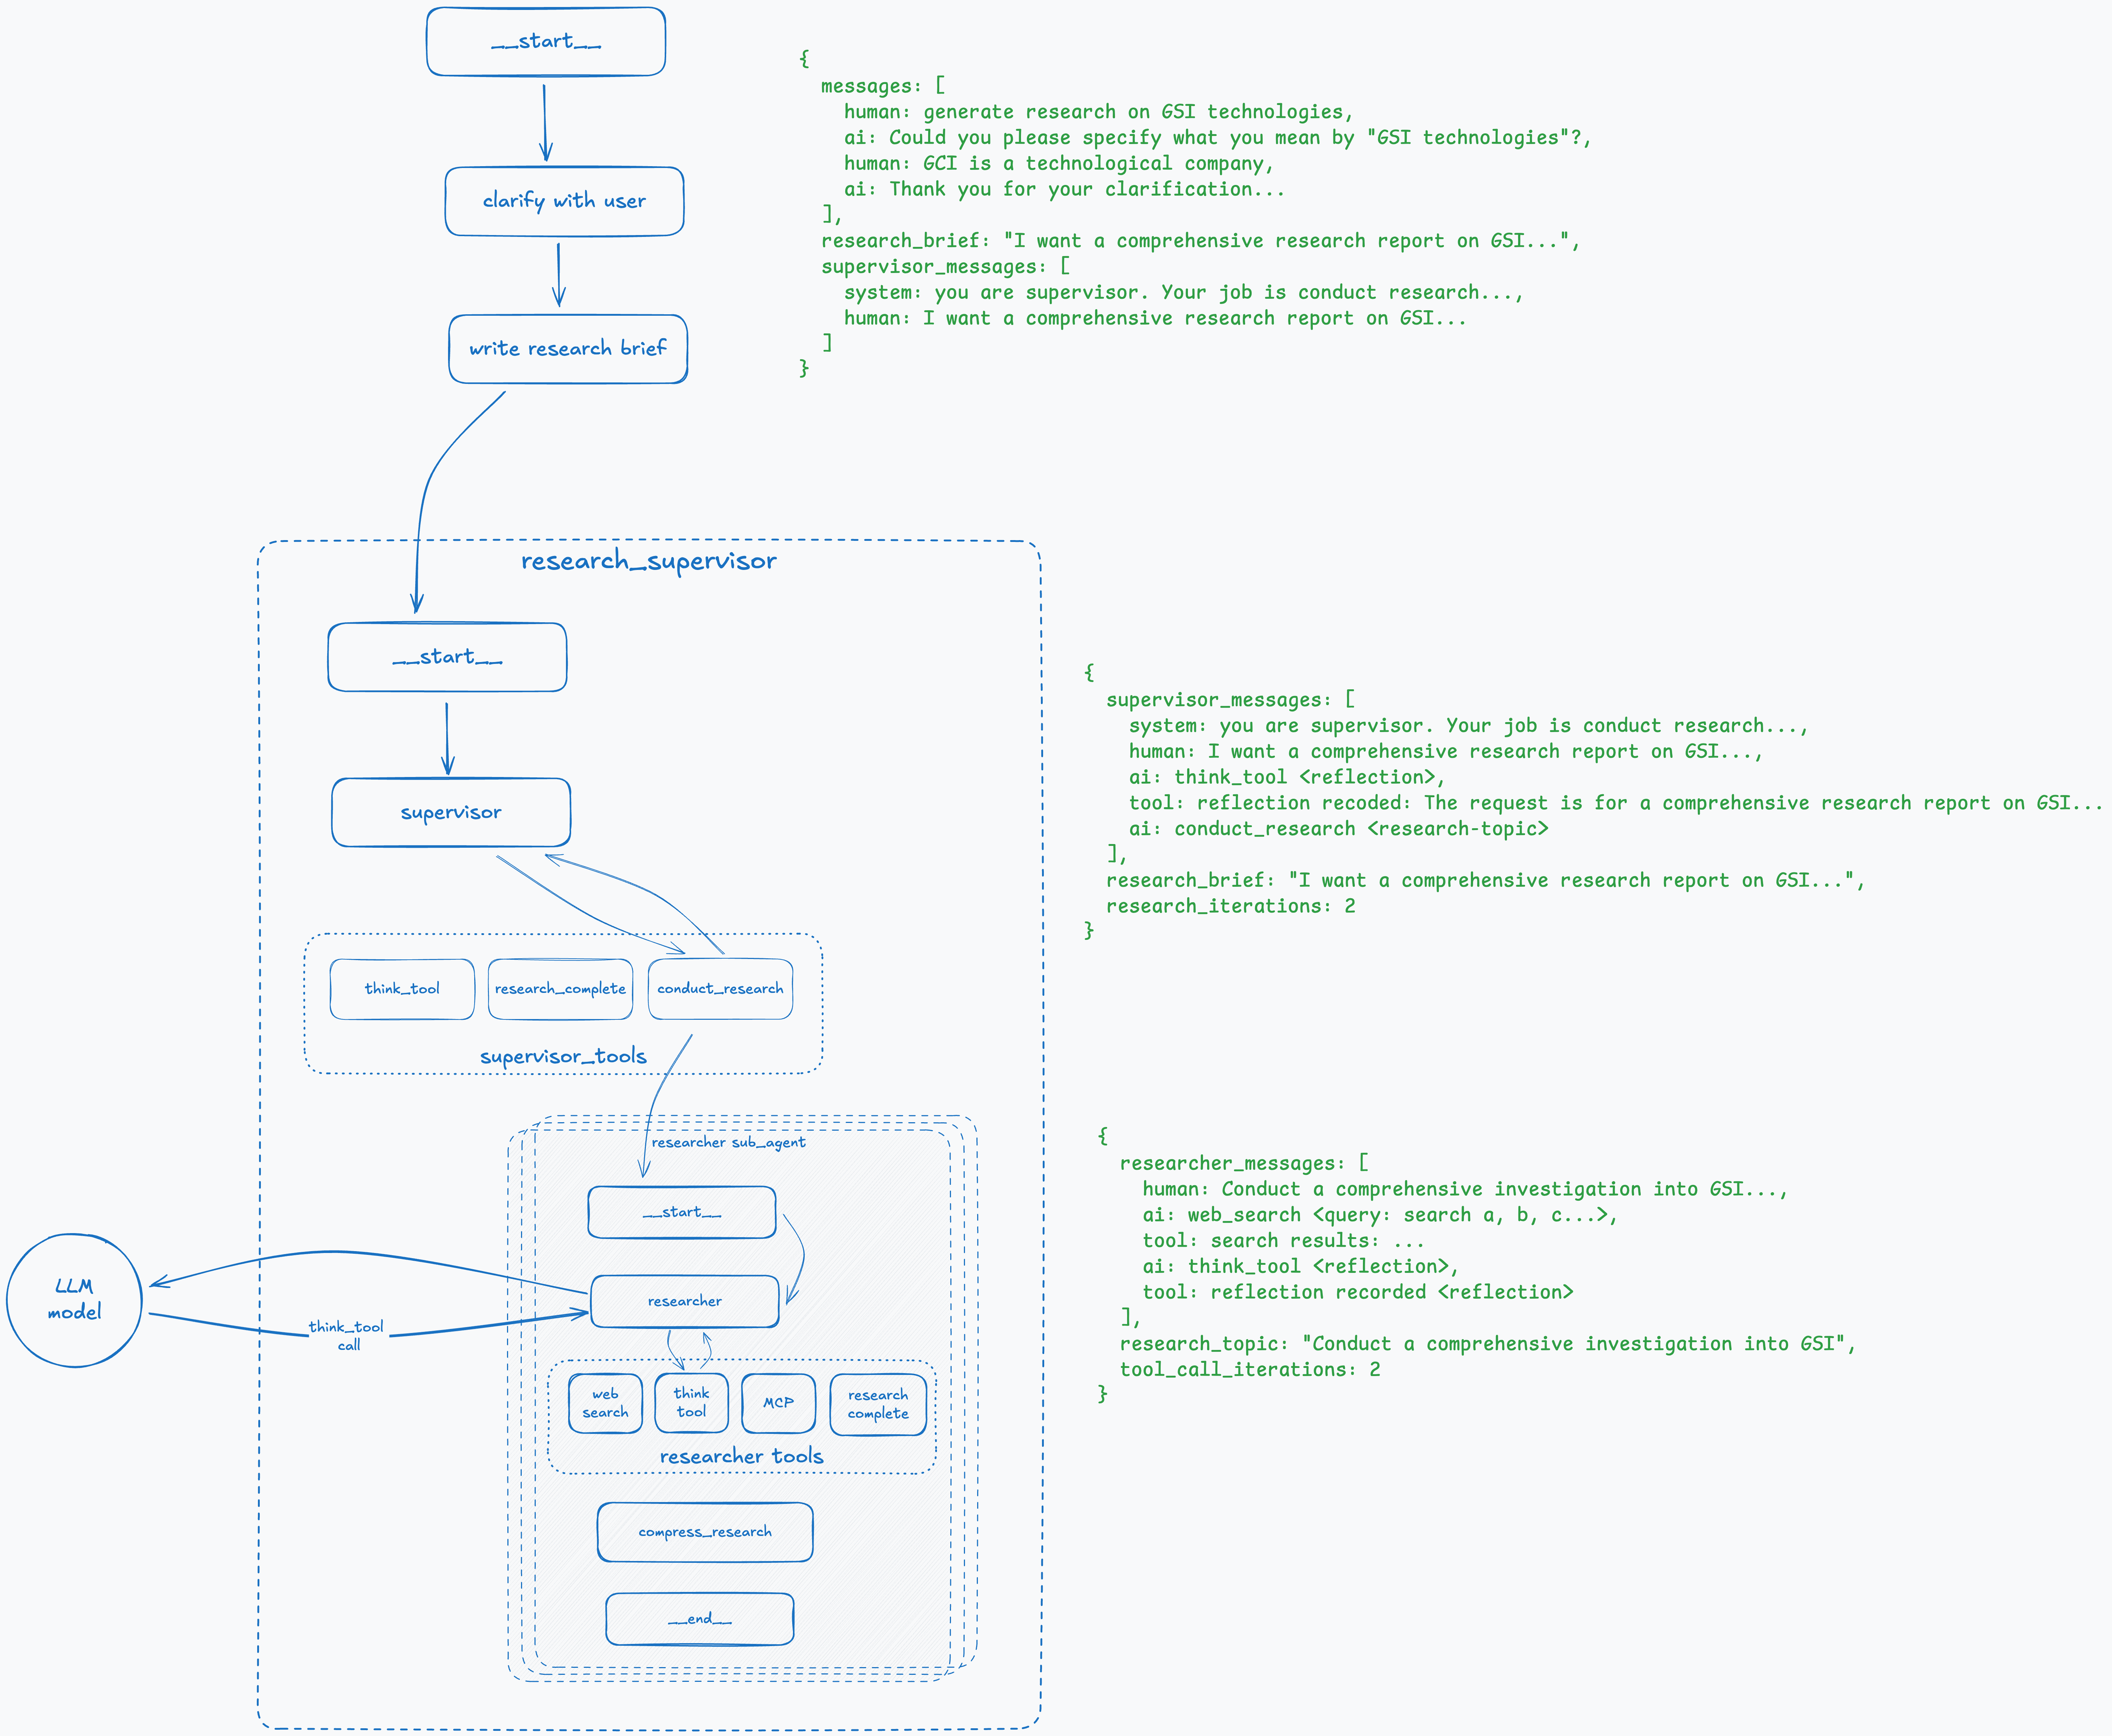
Similar to the supervisor, the research node invokes the think_tool to reflect on received search results and make a decision about whether the results are sufficient or whether to continue.
Step 10: Research Completed

If the result of the think_tool indicates that the research has sufficient information, the research node calls the research_complete tool and goes to the compress_research node. Since the result of the search can be large, we compress the results at this point and return them back to the supervisor.
Step 11: Re-evaluate Research Plan
When results from research sub-agents are received, it’s like finishing a tool call. We store the results in the state and specify to the LLM that conduct_research has finished. The supervisor, as per its system prompt, calls the think_tool to understand what to do next.
Step 12: Research Completed
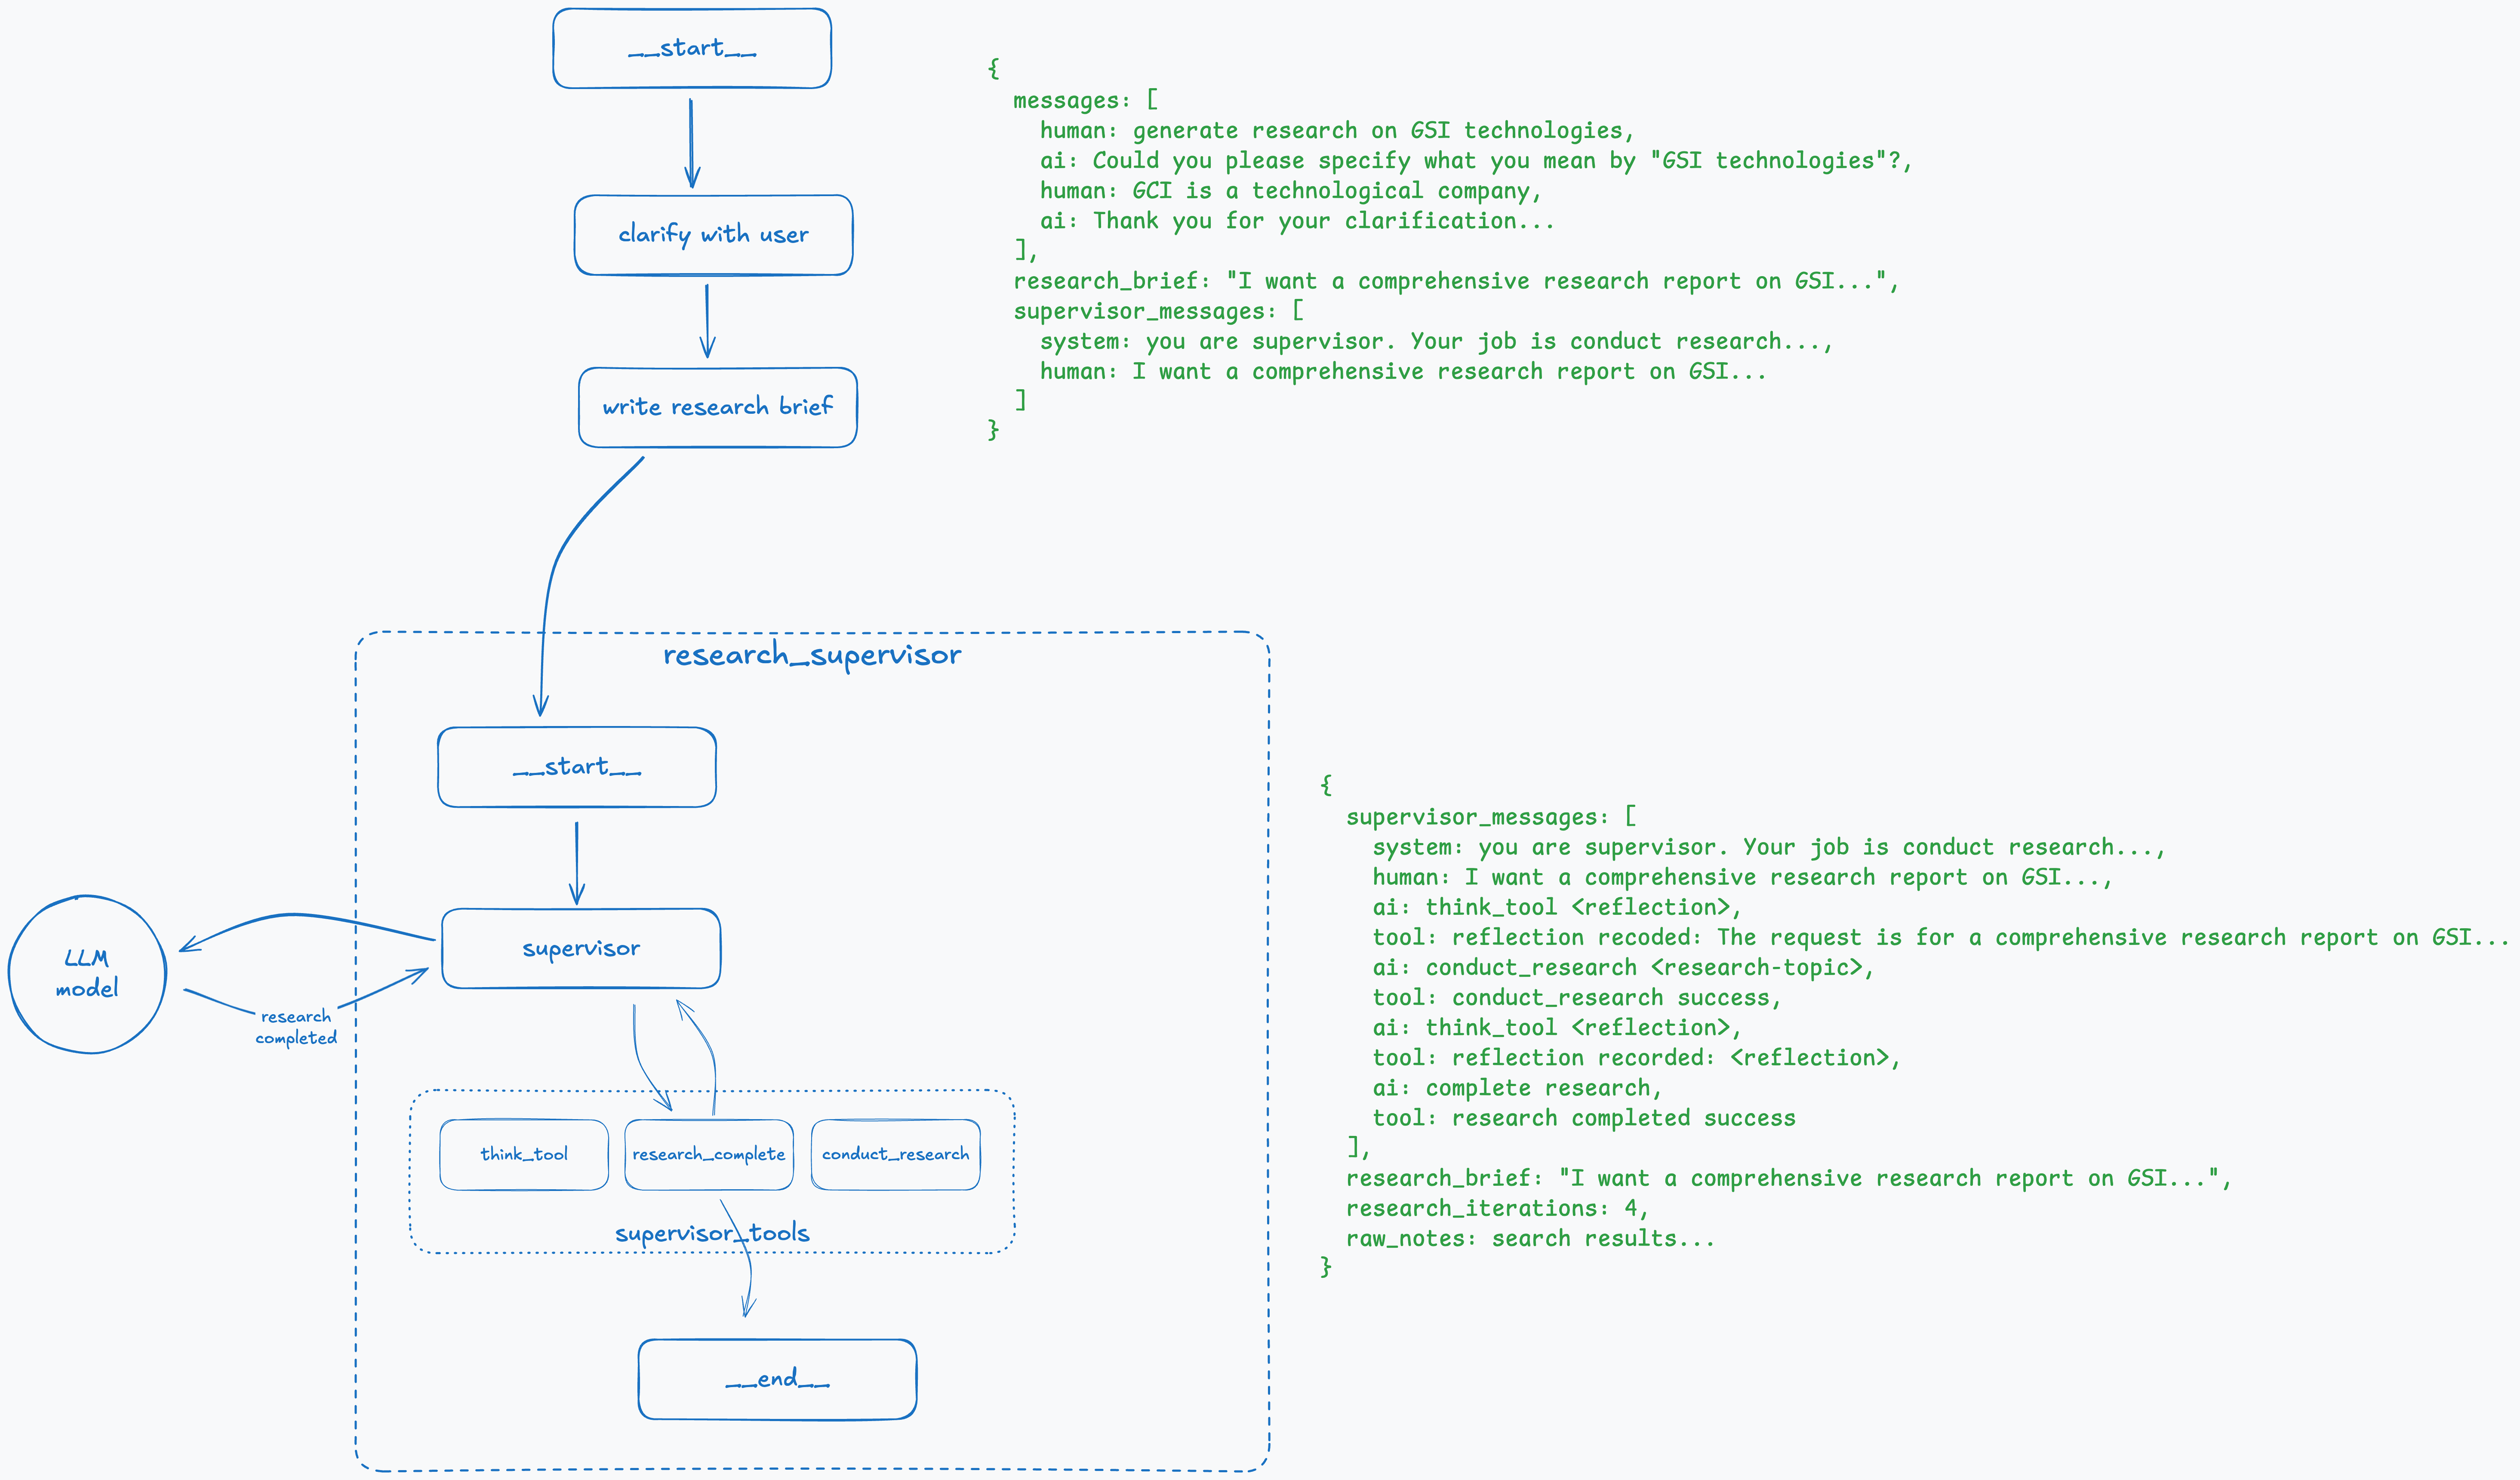
At this stage, reflection indicates that the supervisor has gathered sufficient information for the research the user requested, and the research_complete tool is called to finish executing this subgraph.
Step 13: Generate Final Report
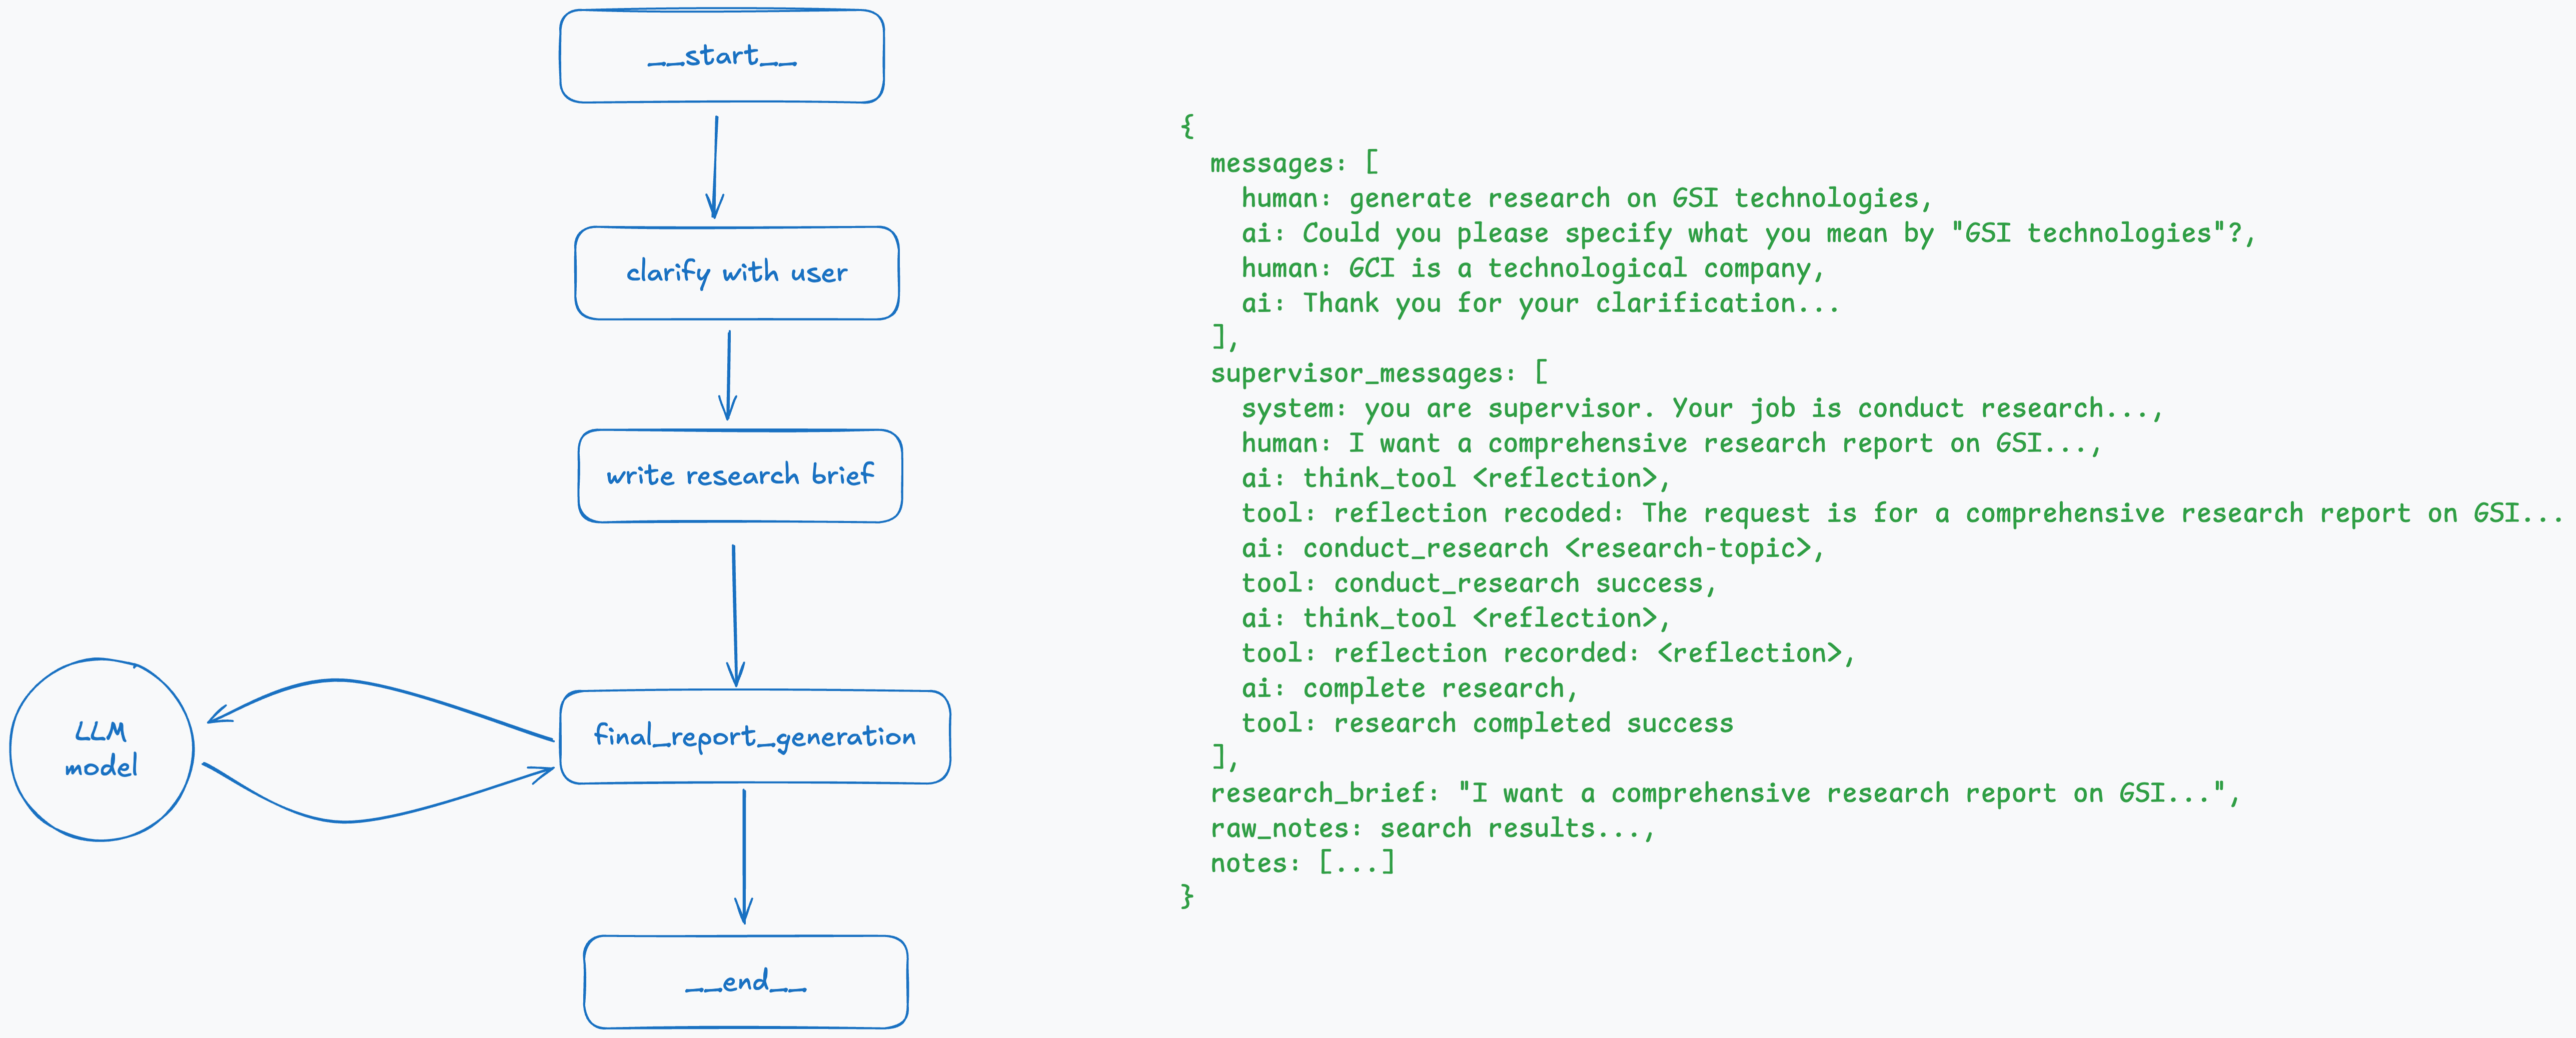
When all subgraphs are complete, the current state contains the message history, supervisor_messages, the brief, and the research results. The last step is to make a call to the LLM to generate the final report and return it to the user.